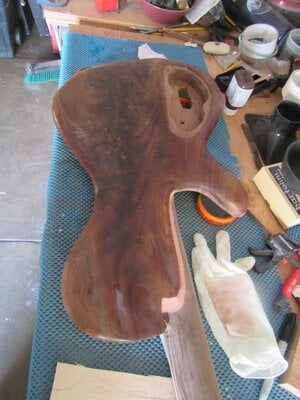
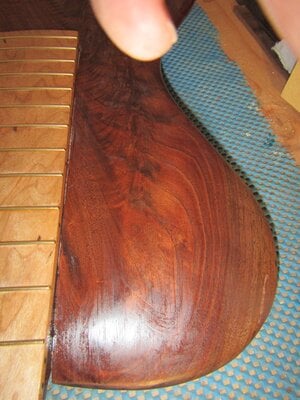
When I got married a few years ago, I developed the idea of building a bass from the same timbers our wedding rings are made from. Well, more or less the same. Our rings are made from walnut with a cherry center band and a juniper heartwood inner sheath. I decided to build a bass with a Claro Walnut body, a gummy cherry fretboard, wenge neck and eastern red cedar accent bits.
Trying to track down juniper heartwood was a bit of a thing. It seems (and I could be wrong here, it’s wood, so the names can get dodgy) that juniper is (or can be) pretty much the same as red cedar (which isn’t even really a cedar at all).
I’m also well aware that Walnut and Claro Walnut are different species, but really, if you have the option of going Claro, over regular black walnut, jump at it, if you like lovely wood.
The little town of Mendocino on the Northern California coast is a really lovely place to vacation or get married. Also, they have a shop that specializes in reclaimed lumber as that part of the country was (and pretty much is) all about logging. Companies cut the trees down and float them down the river to the coast and then mill them up or ship them out. Sometimes the trees would get loose and roll around in the surf on their own. It’s hard not to start making plans to try to bring one of them home. Pretty much all those trees are species used in regular guitar building.
In said shop, I found a pretty nice board of Claro Walnut the week I got married and happily took it and my new wife home. In honor of my nuptials, I’ve named this bass “Bliss.”
The build plan for this bass called for me to build it as quickly as I could manage. I used the build as a way to organize and accelerate my building. There aren’t a whole lot of glue joints (relative to my other builds) and I used aftermarket pickups and bridge instead of making my own from scratch. Also, I figured I’d use nice tuners, because I planned on this bass being my go to player.
I tend to build instruments in one (or more) of three modes: 1, to play 2, to experiment in building techniques 3, to satisfy a specific creative impulse.
I guess Bliss hits all three, but primarily my focus was on #1.
My build order lists Bliss as being #11. Based how I build it’s not really accurate to say it was my 11th build completed. At the time I started Bliss I’d built something on the order of 20 bodies and maybe as many neck blanks, but not matching. Some of which I’ll be using in other builds, some of which are errors and might have reached the end of their road. It gets weird. I would say that when I started to build Bliss last February or so, I’d reached the point that I kind of know what I’m doing as far as building my own bass designs is concerned.
Thank you for enduring this rather long build thread intro. I believe context is important.
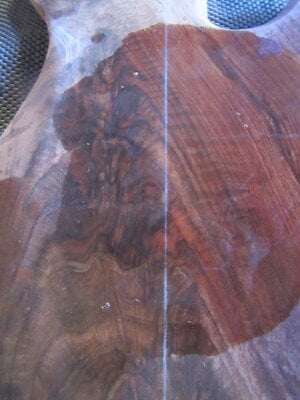
The reclaimed claro slab had some cracks and splits along the end, so I cut it to try to prevent splitting. I also flooded dark titebond into every crack I could. The pic also shows a little bit of denatured alcohol so I could try to see what I was working with. Lots of flame and compression figure.

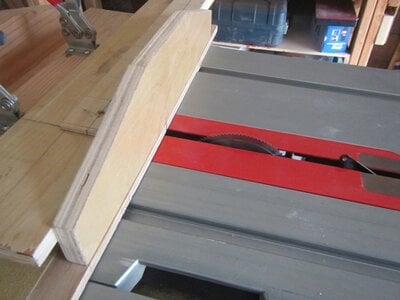
I cut the headstock taper on the neck, the headstock and the stinger at pretty much the same time with a jig on the table saw.

I dropped a steel slug into the neck to anchor the truss rod on one end. I wouldn’t say it’s even close to required, but I can’t shake the idea of the truss rod slowly cutting or compressing the end of the channel over time. I used to cut the slug with a hacksaw, but a dremel with a cutting wheel is much faster.

I glued up the headstock (wenge) and the stinger (red cedar). I used a bit of blue tape to keep the pieces from sliding around too much. I fund the tape method to be almost as effective as the toothpick method, but required me to drill fewer holes.

I marked out the spot for the slug hole on my neck blank and drilled it on the drill press.

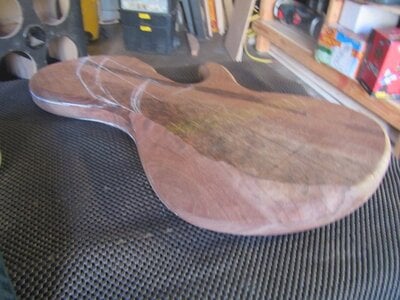
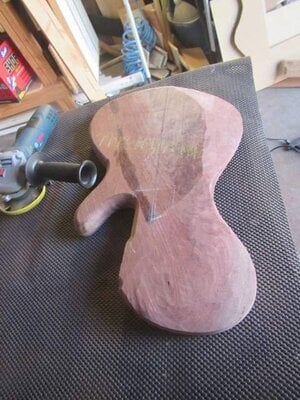
I rough cut the body shape on the bandsaw (not pictured) and then final shaped the edges on the disc sander and the spindle sander. This method is so much faster and safer for me than using a router and template I can’t even say. If I was trying to rock out an industrial method to make every bass uniform, I might have other notions, but for my current building, it’s all about bandsaw, disc and spindle sanders. I can live with the slight variations it produces, and in some cases works out to be a feature, not a bug.

I routed the roundovers at the router table.

My method of cutting the truss rod channel features a dado cut. I made a jig from mostly flat and straight and flat scrap that holds the neck blank and uses the fence as a guide. I like double action Truss Rods from LMII because they can be installed in a single channel without having to rout or ream the access for the nut. Lmii rods are more expensive, but being able to basically rip the channel with a dado stack in a single operation instead of ay two or three operations is worth the extra money to me.

I installed the anchor (tone!) slug with a bit of CA and filled in the end of the TR channel with a properly cut and fit bit of wenge.

I installed the truss rod with a bead of caulk (not pictured) and glued up the fretboard.


It occurs to me that I don’t have pics of milling the lumber. I kind of think it’s not that interesting to see. For this build I bought my cherry lumber from CR Muterspaw in Xenia, Ohio and the wenge from Macbeath Hardwoods in San Francisco, California. I mill the lumber myself to dimension in my garage. I find I can get access to more interesting wood combinations if I mill the stuff myself than if I rely on the ‘luthier” sources. The results tend also be pretty idiosyncratic as well. Luthier tops and whatnot (even with all the A’s their keyboards can type) tend to look about the same to me after a while. I like to be…different.
Trying to track down juniper heartwood was a bit of a thing. It seems (and I could be wrong here, it’s wood, so the names can get dodgy) that juniper is (or can be) pretty much the same as red cedar (which isn’t even really a cedar at all).
I’m also well aware that Walnut and Claro Walnut are different species, but really, if you have the option of going Claro, over regular black walnut, jump at it, if you like lovely wood.
The little town of Mendocino on the Northern California coast is a really lovely place to vacation or get married. Also, they have a shop that specializes in reclaimed lumber as that part of the country was (and pretty much is) all about logging. Companies cut the trees down and float them down the river to the coast and then mill them up or ship them out. Sometimes the trees would get loose and roll around in the surf on their own. It’s hard not to start making plans to try to bring one of them home. Pretty much all those trees are species used in regular guitar building.
In said shop, I found a pretty nice board of Claro Walnut the week I got married and happily took it and my new wife home. In honor of my nuptials, I’ve named this bass “Bliss.”
The build plan for this bass called for me to build it as quickly as I could manage. I used the build as a way to organize and accelerate my building. There aren’t a whole lot of glue joints (relative to my other builds) and I used aftermarket pickups and bridge instead of making my own from scratch. Also, I figured I’d use nice tuners, because I planned on this bass being my go to player.
I tend to build instruments in one (or more) of three modes: 1, to play 2, to experiment in building techniques 3, to satisfy a specific creative impulse.
I guess Bliss hits all three, but primarily my focus was on #1.
My build order lists Bliss as being #11. Based how I build it’s not really accurate to say it was my 11th build completed. At the time I started Bliss I’d built something on the order of 20 bodies and maybe as many neck blanks, but not matching. Some of which I’ll be using in other builds, some of which are errors and might have reached the end of their road. It gets weird. I would say that when I started to build Bliss last February or so, I’d reached the point that I kind of know what I’m doing as far as building my own bass designs is concerned.
Thank you for enduring this rather long build thread intro. I believe context is important.
The reclaimed claro slab had some cracks and splits along the end, so I cut it to try to prevent splitting. I also flooded dark titebond into every crack I could. The pic also shows a little bit of denatured alcohol so I could try to see what I was working with. Lots of flame and compression figure.
I cut the headstock taper on the neck, the headstock and the stinger at pretty much the same time with a jig on the table saw.
I dropped a steel slug into the neck to anchor the truss rod on one end. I wouldn’t say it’s even close to required, but I can’t shake the idea of the truss rod slowly cutting or compressing the end of the channel over time. I used to cut the slug with a hacksaw, but a dremel with a cutting wheel is much faster.
I glued up the headstock (wenge) and the stinger (red cedar). I used a bit of blue tape to keep the pieces from sliding around too much. I fund the tape method to be almost as effective as the toothpick method, but required me to drill fewer holes.
I marked out the spot for the slug hole on my neck blank and drilled it on the drill press.
I rough cut the body shape on the bandsaw (not pictured) and then final shaped the edges on the disc sander and the spindle sander. This method is so much faster and safer for me than using a router and template I can’t even say. If I was trying to rock out an industrial method to make every bass uniform, I might have other notions, but for my current building, it’s all about bandsaw, disc and spindle sanders. I can live with the slight variations it produces, and in some cases works out to be a feature, not a bug.
I routed the roundovers at the router table.
My method of cutting the truss rod channel features a dado cut. I made a jig from mostly flat and straight and flat scrap that holds the neck blank and uses the fence as a guide. I like double action Truss Rods from LMII because they can be installed in a single channel without having to rout or ream the access for the nut. Lmii rods are more expensive, but being able to basically rip the channel with a dado stack in a single operation instead of ay two or three operations is worth the extra money to me.
I installed the anchor (tone!) slug with a bit of CA and filled in the end of the TR channel with a properly cut and fit bit of wenge.
I installed the truss rod with a bead of caulk (not pictured) and glued up the fretboard.
It occurs to me that I don’t have pics of milling the lumber. I kind of think it’s not that interesting to see. For this build I bought my cherry lumber from CR Muterspaw in Xenia, Ohio and the wenge from Macbeath Hardwoods in San Francisco, California. I mill the lumber myself to dimension in my garage. I find I can get access to more interesting wood combinations if I mill the stuff myself than if I rely on the ‘luthier” sources. The results tend also be pretty idiosyncratic as well. Luthier tops and whatnot (even with all the A’s their keyboards can type) tend to look about the same to me after a while. I like to be…different.
