Build 02: The Singlecuts

b3e

Sep 5, 2017
323
758
4,861
Warsaw, Poland
Well the PBass is doing great so far, still tweaking on the setup, but.. I miss the wood shavings and the building, so I decided to start the next build. And actually it will be 2 Singlecuts, one very simple fretless, one fretted with a figured top. Both will be 33 inch scale. Still figuring out the details and the design.

As much as I like the stability a Singlecuts design has, I find most of the attempts to have be pretty massive. Fiddling with cardboard and pencil I decided on trying a single cut with some carve outs on the upper bout and around the lower bout too. I find it could give the design a lighter look. Here's the recent drawing, that I'm leaning to build:

LRM_EXPORT_20171217_134121.jpg

Hope it is readable and makes sense for you. What do you think? Still haven't figured out the pickups, bridge and fretboard end. There are two markers for the 12th and 24th fret.

The fretless will be black limba body, wenge neck, and ebony or rocklite fretboard. I have a nice piece of Black limba already:
LRM_EXPORT_20171217_133619.jpg


For the fretted, I have this nice too of spalted apple coming my way
LRM_EXPORT_20171217_132342.jpg

Totally looking forward to get it in my hands. I think a Ash body and an olive fretboard would make a nice combo, but to be honest, I have no experience with apple wood so far. Anyone of you maybe had a chance to work with it so far?
 
While I don't actually have any practical help for you, I can say that most people seem to find building a little addictive. I'll be finding out starting in a few days!

Your design looks pretty good, I really like how the carved area is shaping up. I think with that feature you'll definitely want to do something unique with the fretboard end. I'll be following along!

-Jake
 
Apple is a good wood, fairly hard, tends to have lots of chatoyance, most of the problems with it are getting it from log to lumber (can be difficult to dry without significant losses.) Favored for making tools.

Any spalted wood is highly dependent on where the particular piece is on the "wood to compost" spectrum, as "partially rotten" is the less marketable term for "spalted." At some point I posted a picture of a hunk of spalted maple in my stock that ranges from solid to pure punk at various spots on the board.
 
Last edited:
  • Like
Reactions: RBS_Johnson
I'm spending some time building up a prototype out of some old pine I had lying around. Actually it was an old windowsill I had preserved from my flat renovation. I wanted to build a tele out of it once, but figured, it could serve well as a bass prototype. And yes, I intend to build up the whole thing, not just a test body, because I'm playing with done neck designs I want to try to complement this instrument.

So far I joined and glued together a 5 piece body, cleaned it up and dimensioned the blank. Then I cut out the shape leaving the lower bout for now. I'm still thinking of how to best cut the neck pocket. I also wanted had to fix a knot on the side first. There is the current state of the prototype body:

LRM_EXPORT_20171227_171805.jpg

LRM_EXPORT_20171227_171938.jpg

LRM_EXPORT_20171227_171952.jpg

And the knot, drilled out and fixed with a dowel :))

LRM_EXPORT_20171227_172020.jpg


The prototype will get a maple cap, circa 3mm thick, I had some old maple veneer, rough cut, that I plained to clean it up, joined and currently I'm glueing them together. Some joints will be visible as I couldn't match the grain perfectly with what I had, but they should work ok, just to outline the contouring and curves. My improvised veneer gluing board:

LRM_EXPORT_20171227_171902.jpg


You can see 3 pieces in here. I positioned the aluminum bars to match the veneer panel dimensions, then moved them closer by around 2mm, so I could join the she's being glued and press them down together to make them fit really tight. Additional flat pieces of wood and clamps keep them in place. After they are used, I will plane them level on the back side ( the one facing up) and glue it to the pine plank.

Still drawing a lot headstocks and pickup/bridge variants. And reading a lot, mostly Walnut builds ;)
 
It's new wood day today!:)) I just received the package with the tops, fretboards and neck blanks. I especially like the olive wood fingerboard, nice resonant tap tone and seems pretty dense, the two others are european walnut:
LRM_EXPORT_20171228_205234.jpg

The tops are pure art, l'll have to be careful to make the best use of them. Thickness is around 10mm, good hardness, no rotten spots, I'm looking forward to work with them. The supplier threw in matching headstock plates, which was very very nice of him. Here are the sets.

LRM_EXPORT_20171228_205053.jpg


Don't know which one/ones I'll be using first yet, I made some simple outlining to get a grasp of the figuring in the planned body shape. A quick teaser below for all wood lovers..

LRM_EXPORT_20171228_204556.jpg

LRM_EXPORT_20171228_204711.jpg

LRM_EXPORT_20171228_204859.jpg

Of course I also made a mistake ordering neck blanks, that are too short for a bass.. have to figure out what to do about this. Anyway, back to shaping the prototype for now to get it right. No place for mistakes with those pieces.

One think I'm sure about myself now - I'm officially a wood junkie! ;)
 
Moving on with the prototype, I glued on the maple cap and roughed out the shape. I made my first attempts to rout out the body using a template and a template bit. It went pretty good for the first time, although I had some cleaning up to do and had one tear out in the arm rest area that will be rounded, so it wasn't crucial. But I'm using the chance to learn some techniques and not practice on the final stock.

LRM_EXPORT_20171229_192334.jpg

LRM_EXPORT_20171229_192356.jpg

LRM_EXPORT_20171229_192408.jpg

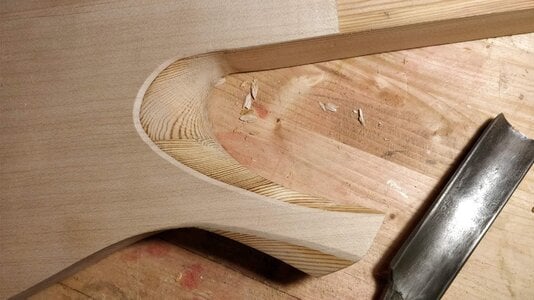
Then I went on with cleaning up the routings and moved on with shaping the arm rest and bouts. It's fun work with chisels and scrapers. I'm rough sanding the wood to 60 grit, it doesn't matter for now if it's totally smooth. I want to get a feel for the ergonomics right now and see if the balance makes sense. The armrest and lower bout feel comfortable right now. I will move on with shaping the back to see what works best, then adjust the design if needed. Here are a few process pics:

LRM_EXPORT_20171229_192528.jpg
LRM_EXPORT_20171229_192516.jpg

LRM_EXPORT_20171229_192545.jpg

The thing I'm thinking about is, the figured tops are 8 to 10mm thick. This here in the pictures is a veneer
around 2mm. I will have to make the bevels steeper to maintain the lines, or size down the tops. Maybe do carved tops? Don't know yet. Resawing them to 5mm doesn't seem to make a lot of sense.
 

Attachments

  • LRM_EXPORT_20171229_192528.jpg
    LRM_EXPORT_20171229_192528.jpg
    271.4 KB · Views: 24
Last edited:
Had the chance to do some work on the prototype today finishing the contouring. I disassembled my Sandberg, as the dimensions at the heel are similar to what I plan for the 5 string. I wanted to use the neck as a template for the pocket. When I screw it apart I actually got astound to find a neck shim there and multiple redrilled screw holes. Not that I mind, but my first though was.. "really Sandberg? Don't you use any templates for those?". Then my second thought was, that the joint on my previous build was actually much much cleaner, which - gave me a big smile :) here is how it looks like:
LRM_EXPORT_20180105_151104.jpg

LRM_EXPORT_20180105_151120.jpg

Anyway, i've spend some nice hours with chisels, gouges and planes today, which was great fun and I learned, I love scrapers. Awesome simple tools, that when sharp leave a great finish and can work with curves giving them that sharp line. One thing to watch, as always, don't go against the grain. The body shape I'm at so far looks like this:
LRM_EXPORT_20180105_151242.jpg

LRM_EXPORT_20180105_151318.jpg

LRM_EXPORT_20180105_151302.jpg

I also tried it with the neck on and a simple neck template to see how it feels in general. The balance is right, I had to redo the rib carving a bit and worked on different roundings. I'm really happy I did the prototype. It allowed me to get the shape right where I want it, now I can do some templates based on it, that will give replicable results. I want those basses to feel right and exactly the same. This is how it looks with the fake neck, which is unfortunately too narrow, and with the Sandberg one:
LRM_EXPORT_20180105_151358.jpg

LRM_EXPORT_20180105_151446.jpg

LRM_EXPORT_20180105_151437.jpg


I guess I'm confident about the ergonomics at this point and ready to build the real stuff. Of course it will get a different, hopefully better matching headstock. Thanks for following and all the good words!:)
 
Thank you for the comments and encouragement!

I still consider whether to go with a bolt-on or a set-in construction and have the joint hidden under the top plate. I'm currently trying to figure out the right angle of the neck pocket :)

I thinned the body yesterday to 37mm and actually like it even better. What I'm wondering is, if I could go down to 35mm and still be safe? If I think of thinning down a 52mm board to 38mm, it's actually such a waste of material. Resawing it into 25mm boards and adding a 10mm cap would be a great saving of timber and trees. But then, if you have a cupped board you probably don't have enough margin for flattening, sanding etc.
 
  • Like
Reactions: rwkeating
Today I spend some hours at drawing. First of all I finally wanted to have a good sparring with the headstock ideas bouncing in my head. I all ready did around 20 drawings so far, but none where satisfactory. The goal is to have a headstock that :
a) would be more or less universal to different designs (which is the first assumption error),
b) would be good for a 2/2, 2/3 or 3/2, eventually a 3/3 tuner settings whiteout much rescaling
c) to be shorter that those classic designs, I really want to drop some weight here on the neck balance. I also moved the neck a little deeper into the body and went with the 33" inch scale to account for that.

What I ended up with is this (sorry for the bad quality of pics today, but pencil and tracing paper are hard to picture):
LRM_EXPORT_20180106_184321.jpg

LRM_EXPORT_20180106_184503.jpg

Maybe it's not very sophisticated or original, but I have no better ideas that fit the bill right now. I guess I can add a twist to the end that follows the body design to this shape.

Next, since I was at drawing I went with solving another problem - the neck design. I wanted to challenge myself with a laminate neck. The problem is, I have just one long enough wenge piece (93cm long), which would do great, but all the other wood pieces suitable for necks I currently have are just too short for a bass, unless it would be headless (also an option I guess ;)). So I chose to work with this wenge piece and a pear piece of around 71cm. Here are the two of them:
LRM_EXPORT_20180106_184535.jpg


Another challenge I want to try is - waste as little wood as possible. I figured, if i go with a tapered laminate neck, I could have 3 wenge pieces that are totally square cut off the board and 2 pear pieces with a taper, but both coming from square cut off. Reversing one of theme should even maintain the right grain direction. The laminate will look like this:
20mm wenge stripe
15mm -> 5mm tapered pear stripe
6mm wenge stripe
15mm -> 5mm tapered pear stripe
20mm wenge stripe

Additionally I would need two little pear stripes on the headstock, and 2 wenge ears. I hope it doesn't sound complicated and the picture below makes it easy to follow:
LRM_EXPORT_20180106_184730.jpg

LRM_EXPORT_20180106_184814.jpg

I marked the wenge dark, and traced the neck in blue. You can also see where the pear strips will have to be joined somehow.

...and this is what I tried to figure out for the next hour :)) the current design is for a scarf joint of 12 degrees. If I join the pear pieces at 25 degrees... I could actually fully hide the joint inside the scarf joint. The blue lines in the picture are where the joint would be, the dashed line in the bottom drawing is where the neck would be carved.
LRM_EXPORT_20180106_184851.jpg

LRM_EXPORT_20180106_184944.jpg

I hope it's all readable. Are there any cons for such a small piece of wood glued inside the scarf joint, or, in general about the whole approach?

Another idea I'm considering is to go with a flat headstock, but then I would probably think of tapering the pear stripes differently to have a full wenge headstock. Anyway, if any ideas come you your mind, please share!:)
 
Some more drawing today with a 3 and 5 piece laminate. Have hard time deciding between those two. The 5piece would probably look great, I like how the woods transition into each other. On the other hand the 3piece is much much easier to cut and prep taking into account the use of a - yeah, handsaw. Stability wise, I don't think it makes any difference. Anyway, here are both design near the headstock area

LRM_EXPORT_20180107_124413.jpg

LRM_EXPORT_20180107_124436.jpg


I still want to maintain the taper of the center pieces, leaving the outer at same width. The ears would be glued onto the headstock in both versions. I also think I will go with no scarf joint, just a flat headstock. Anyway, I'm up to sharpen the plane and start prepping the wood.
 
Very nice body shape, I like how the top bout “implies” a top horn free of the body, but you still have the extra neck support, which avoids the “mutant earlobe” effect some single cuts get. If the top veneer has some strong contrast to the main body wood, that gets enhanced. You’d see it again on the Lower horn, like two different body outlines, one “real” and one implied. I have yet to try a scarf joint, a little intimidated by the joinery there, particularly in multi laminate design. Very smart building a prototype, though in your case it looks like it will be a work of art in itself. In your case, I’d keep it strung up as a beater or test bed. I made my only prototype out of plywood, but I’m still loathe to throw it away.
 
  • Like
Reactions: wraub and b3e
Very nice body shape, I like how the top bout “implies” a top horn free of the body, but you still have the extra neck support, which avoids the “mutant earlobe” effect some single cuts get. If the top veneer has some strong contrast to the main body wood, that gets enhanced. You’d see it again on the Lower horn, like two different body outlines, one “real” and one implied. I have yet to try a scarf joint, a little intimidated by the joinery there, particularly in multi laminate design. Very smart building a prototype, though in your case it looks like it will be a work of art in itself. In your case, I’d keep it strung up as a beater or test bed. I made my only prototype out of plywood, but I’m still loathe to throw it away.

That was exactly what I was thinking while approaching the Singlecuts, I kinda wanted the design to be lighter, without that big upper bout, which in most cases look very heavy for my taste. I hope the final result will be good, but looking at all the design changes I make, I have to keep myself focused to what I want to achieve.

I guess I will spare the prototype, currently thinking about a dovetail or a japanese kinda joint for the neck and I pitty, that I already carved the neck pocket as is, but I can make a try on another piece of scrap. It would be great to have either a good lock ing system for a set in or a neck you could detach with just one bolt. :) But I can leave it at a dream level for now :)

Thanks for all the good words!:)
Tom
 
Last edited:
  • Like
Reactions: Gilmourisgod
Sometimes I envy everyone owning a table saw, seriously, who nowadays would rip a wenge board lengthwise into several 2 and 3 cm pieces with a handsaw? You guessed right!;) I just finished my second afternoon cutting the wood for the neck and.. still got some to go. Anyway, I picked the 3piece neck design in the end and I'm glad I did. I can just handle those bigger pieces better. For now at least. Here is some progress:

LRM_EXPORT_20180108_221736.jpg

LRM_EXPORT_20180108_221800.jpg

I used a aluminum bar as a guide for a while, but left it eventually, because the saw bit into it and it would be a pitty to destroy the blade. But I found I can score with my fretsaw along the bar from both sides and have that way great guiding lines for the blade. And that's what I ended doing for the rest of the cuts.

Having a 3 piece neck allows me to also optimise planing and not have to plane those very thin strips clamping them in every possible way. After cutting of a piece i just planed the board edge again and planned the next cut. The rough cut became the outside of the neck, the prepped edge, the inside of the laminate. The pear strips in the middle required some planing from both sides though. A freshly sharpened plane is essential for this. I could take off very little material in one pass
LRM_EXPORT_20180108_221810.jpg

Originally I wanted to have the wenge pieces tapered at the ends, so I can glue them together and have the pear stripe blend into the headstock, so I used the plane to taper the pieces. The procedure is fairly easy, first you mark the angle point and mark the whole surface to be tapered. Then you start introducing the taper taking off material in shallow passes, starting with a small pass at the end of the board, then a medium one, then a full pass. You will remove the markings you made and see where you are. Mark again and repeat until you achieve the planned width of the board at the board end. It is important to check for squareness and flatness to be sure everything will glue together fine. Here is the process pictured:
LRM_EXPORT_20180108_221821.jpg

LRM_EXPORT_20180108_221828.jpg

LRM_EXPORT_20180108_221835.jpg

LRM_EXPORT_20180108_221845.jpg

LRM_EXPORT_20180108_221853.jpg


I then decided to keep the pear stripe through the whole headstock, so went on to flatten out the taper in the end. You actually just take off the high spot and blend it in.

As mentioned, the pear wood blank I had was to short, so I decided to use an offcut and make the remaining piece out of it. I planes a taper into it:
LRM_EXPORT_20180108_221901.jpg

Then I marked where I wanted to match the two pieces and cut them to length. I needed a clean joint, but didn't want to make any dovetail joints or complicate it in any other way, just a simple straight cut. As I postponed the construction of a shooting board for my workshop and finally forgot about it, I had to improvise one using scrap, MDF and clamps.
LRM_EXPORT_20180108_221909.jpg

LRM_EXPORT_20180108_221915.jpg

A shooting board is a great tool for squaring smaller boards or pieces, especially when you work with endgrain. It helps to avoid tear out and gives a clean cut angle. Here you can see how the joint looks and how it matches:
LRM_EXPORT_20180108_221924.jpg

LRM_EXPORT_20180108_221934.jpg

LRM_EXPORT_20180108_221941.jpg


It should look all right after glue up and planing.
The neck is nearly ready for glue up. What I totally screwed up today was one cut, where I had to take 2-3 mm of the board to have it flat again. What that means is, I'll have to compensate with some additional veneer pieces in the neck to be at the width I need. So, going for a hunt for black veneer now!:)) Hope you don't mind the lengthy post.
 
Dang, you got some SKILLS, brother. No way I could rip wenge like that with a handsaw. If you end up buying a tablesaw, I'd highly recommend the Dewalt portable contractor's jobsite saw, rack and pinion fence, built-in splitter, and a built in dust shroud. I see one at every jobsite I go to, in use by framers and finish carpenters alike. If money were no object, I'd get a Sawstop cabinet saw, of course, my Dream Saw. In the meantime I make do with my old Jet Contractor's, but it scares me more than a little.
https://www.amazon.com/dp/B000HXT2N...t=&hvlocphy=9002127&hvtargid=pla-382123643027
 
@Gilmourisgod, thanks for the great information. I'm currently not planning to, as I have limited space and I guess my neighbours wouldn't appreciate that. But it's good to know what tools are reliable. The DeWalt looks pretty decent. If my brother ends up building his workshop, I'll talk to him about how we could make it work for both of us and what to contribute :) For now I'm happy I still have my 10 fingers to play guitar :)

@Matt Liebenau, thanks Matt! I hope the glue up will go smoothly and the lines will be tight :) Started counting workhours and the clock is currently on 10 for the prepping, ripping , matching, etc. Another 5-10 and I should be there with the glueup for both necks.