Eko hollowbody corpse resurrection

craigie

Guest
Nov 11, 2015
2,310
2,647
4,616
50
calgary
Here's a thread to document my "build" of a bass from various parts. Not so much lutherie as hackery. My experience to date is with swapping pickups, bridges, Fender necks which have all just bolted right in, and 5 years of rough carpentry.

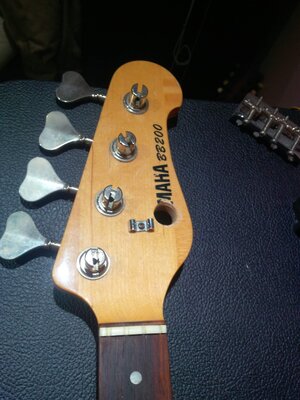
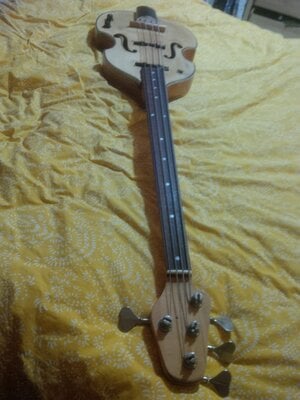
I recently acquired an Eko hollowbody without any hardware or pickups--just the body which had been sanded and the neck which was pooched (fretboard lifting off). I decided to scrap the neck and put on an old fretless conversion neck from a yamaha BB200 which was my second bass I ever bought. I didn't really like the basswood body or white colour and had tried unsuccessfully to refinish it. So here's the perfect vehicle to put that neck back in action. $25 CAD for the corpse from a local guy (his words). Pickups, neck, bridge and pots I had lying around. I've already done steps 1 to 3 below and didn't take before pictures :( but the body was not much different looking than now.

Steps:
1. Layout. Plan where everything will go.
2. Fit neck into neck pocket. Neck is wider than original.
3. Prepare body. Carve out pickup "cavities', sand, fill etc.
4. Acquire missing hardware and fit to bass. Tailpiece (maybe bridge) and three way switch.
5. Reshape neck headstock because of hole.
6. Finish body and the cut part of the headstock with Tru oil and some kind of tint to a blond finish.
7. Wire in electronics.
8. Enjoy!

I'm figuring this out as I go so advice is welcome! Here's what the bass looks like so far mocked up along with the loots used--chisels, hacksaw blade, files, sandpaper, box knife and tapered grinding bit on the drill. I forgot to include the awl which I used to scribe around the neck and pickups.
IMG_20160922_195901.jpg
 
  • Like
Reactions: Freekmagnet
IMG_20160922_194155.jpg

Here's the back of the bass. The colour is pretty white. You can see where the binding and side are separated from the back just up by the neck (top left of photo). Some of the original finish is left in the bouts and around the neck (hard to sand there).

IMG_20160922_195224.jpg

Better view of the original finish. After taking the photos I cleaned off the sanding residue and it looks better.
IMG_20160922_195316.jpg


Some areas that will need to be filled. I haven't decided how to do it yet. I'm thinking of just using some black wood fill that I have. My goal here isn't to make it look perfect or new but to make it look good and still show all the old wear and imperfections.

IMG_20160922_195424.jpg


I used chisels to carve out the neck pocket for the wider neck and to enlarge the existing pickup holes to fit jazz bass pickups. You can see the fresh wood. There's a little reinforcing beam that isn't actually attached at the neck end, so the top is free to float. I still need to carve it back a bit so that the neck will fit snug back into the pocket without a gap. I notched the beam down with chisels to fit the pickups. It's not much of a supporting member anyway.
IMG_20160922_194443.jpg

I'm pretty proud of my work here. The neck fits nice and snug and I have to work it into the pocket. I'll have to fill in the old holes by drilling them out and gluing and dowling them. I have the neck plate but need to find the right size and length screws. You can see where I cut the body where the neck joins. The wider neck pushed the sides out. Since they are plywood I could only do some much carving them. I opted to cut notches on each side.
IMG_20160922_194303.jpg

Here's view of how black and gungy the inside is. I hope that's not dry rot.... I'll try scraping it to see what comes up.

IMG_20160922_194524.jpg


About 20 years ago I cut a hole in the headstock to install a tuning machine and turn it into a five string, which I never did. I'll trace out a more telecaster style shape and cut it out. That will also slightly improve the massive neck dive but I'll install a strap button on the back of the headstock to deal with that. I also ripped out the frets with a butter knife because I heard that's what Jaco did. I had a luthier fill the slots for me and he did a nice job. The neck is actually really nice to play.

IMG_20160922_194136.jpg

I really like the grain and the natural look of the bass. I think it's going to turn out nice! You can see the little wedge of wood I put under the "beam" to support it while I carved it down to fit the pickups. I put one under each pickup.

IMG_20160922_194106.jpg

Here's the back of the original neck. You can see it's made of laminations. I already pried off the fretboard and hacked it up.

IMG_20160922_194221.jpg


And the last photo for the day showing details of the wood. I like the darkened stains around the old screws and switch hole. There are spots where it looks like the grain has torn out (to the upper left of the f hole) and rough areas around the f holes. I couldn't sand those out and think I'll just leave them. The white spot from the previous floating bridge also wouldn't come out and will be left.

That's it for today. If you read all this thanks for checking it out and I promise to continue the thread and finish the build (unlike my double bass project which has sat for a year in my basement).

Cheers,
Craig
 

Attachments

  • IMG_20160922_194524.jpg
    IMG_20160922_194524.jpg
    479.8 KB · Views: 37
  • Like
Reactions: Freekmagnet
View attachment 955028

And the last photo for the day showing details of the wood. I like the darkened stains around the old screws and switch hole. There are spots where it looks like the grain has torn out (to the upper left of the f hole) and rough areas around the f holes. I couldn't sand those out and think I'll just leave them. The white spot from the previous floating bridge also wouldn't come out and will be left.
this looks like a really fun project to play around with, hope you enjoy it. :)

The odd looking grain near the f holes and other spots is from the spruce veneer being sanded through and exposing the next layer of plywood below it. The more you sand, the more of that top veneer you will sand away. Probably best to minimize any further sanding and just go from here. Cool project, can't wait for updates... :)
 
  • Like
Reactions: Will_White
this looks like a really fun project to play around with, hope you enjoy it. :)

The odd looking grain near the f holes and other spots is from the spruce veneer being sanded through and exposing the next layer of plywood below it. The more you sand, the more of that top veneer you will sand away. Probably best to minimize any further sanding and just go from here. Cool project, can't wait for updates... :)

I thought the same thing, but couldn't be sure looking at the pictures on my phone. I had this same concern on mine, but I managed to avoid too much sand through.
 
It's definitely tricky to avoid, and most of us have done it at least once. :D Easily hidden with an opaque finish though. Otherwise it shows, but it's all just character and mojo anyway...
 
Here are more pics from the last week:
I traced out a circular shape on the headstock in pencil. I tried using a hacksaw to cut it thinking that I could get a curved cut but it wouldn't cut very well. So I used a saw and cut out wedges so that the saw wouldn't get entrapped. The end result was jagged but I was able to easily file it down with lots of work. I screwed the old neck to the body so I could use it to hold the body while it dried from the Tru Oil. Here's a shot of the finish. Sorry the images came up in random order and repeats of some. I've got a touchscreen computer and my cordless mouse seems to have walked away (probably my two year old made off with it), so it's a bit of a pain to work the computer.
IMG_20160924_183042.jpg
IMG_20160924_183838.jpg
IMG_20160924_184041.jpg
IMG_20160924_184045.jpg
IMG_20160924_184124.jpg
IMG_20160924_184720.jpg
IMG_20160924_190058.jpg
IMG_20160924_191853.jpg
IMG_20160924_190058.jpg
IMG_20160924_184720.jpg
IMG_20160924_184124.jpg
IMG_20160924_184045.jpg
IMG_20160924_184041.jpg
IMG_20160924_183838.jpg
IMG_20160924_183042.jpg
IMG_20160924_183016.jpg
IMG_20160924_182950.jpg
IMG_20160924_183016.jpg
 
Again, photos above in reverse order. The mock up showing my first prototype tailpiece. Turns out it was too narrow and I was better off with a tailpiece where the strings were at the correct spacing (as I first thought). It was easy to make the second one though after making the first. There's a closeup of the body showing a shiny drip from the Tru Oil. These can be seen by shifting the body around and getting the right angle of light. They can be removed with very light sanding. I used 1000 grit sandpaper.

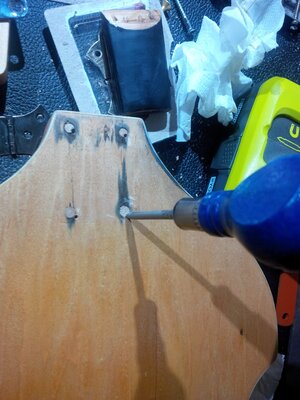
One problem I had was that the neck plate wasn't the original one, but close. Thankfully I realised it before I did any drilling. I glued wood dowels into the original holes and drilled them out again. I reamed out the holes with the correct drill bit size until the dowels were a snug fit. I put some wood glue on them and hammered them into place. I did the same on the neck where the holes were close enough to the new ones. I will have to do the other two original holes as well. I cut the dowels flush with a chisel and shaved them down. The original neck plate position wasn't centred anyway, so I put the neckplate exactly where I wanted it and used my trusty awl to mark the new holes. I then used the awl to enlarge the holes so that my drill bit wouldn't squib around when starting the hole. I worked by way up the the drill bit that fit the new screws I picked up. I got wood screws with an unthreaded length so that only the threads in the neck would grip and it would pull the neck tight to the body. The screw length was such that I was in danger of drilling through to the top of the fingerboard. I made a "stop" on my drill bit by lining it up with the screw (through the plate to account for the plate thickness) and wrapping it with tape. Then I carefully drilled out the holes with my neck in place. I screwed everything together and found I needed to deepen a couple of the holes. I carefully reworked them until everything fit. But first with the neck off the body I reamed out the holes with the drill bit until the screws would pass through without the threads biting. They ended up being nice and snug. After I got the neck on I was able to get everything strung up and try it out. A very satisfying moment!

The bass was very creaky as I tensioned the strings. I started with it tuned very low and it seemed ok! As I increased the tension, with more creaking, there was a sudden pop! The centre brace (the one I carved out for the pickups) separated from the top between the pickup holes. The bottom layer of lamination of the body separated from the other layers. The brace wasn't glued from the bridge pickup to the back of the body. I took everything apart and used wood glue along the entire length of the brace and glued and clamped it in place. I made up two vertical braces to wedge that top brace in place, like the sound post of a double bass. They aren't glued but are just wedged in place (I should take some photos of those).

I restrung everything and it's a lot more solid. I still tune it was low as it seems to play and sound better with very low tension. I'm very satisfied with the sound, look and feel so far. It's like a mini upright! I'm hopefull about how it will sound wired up. When I put my ear against the body it sounds nice and full with a very deep fundamental (almost like a sub fundamental if that is possible). Maybe it's just that with my alder solid body basses the mids overpower the fundamental to my ear when I put it against the body. Next step is to wire it up. I got a bunch of supplies from BE electronics and will pick up my jazz bass today from which I'll pirate my split jazz pickups.

Here's my wiring diagram I sketched out. I'll have a three way mini toggle switch (DPDT on-on-on) and a blend. I wasn't going to have a volume but that would leave me with an extra hole in the body. So after the blend I may have a master volume and master tone. Maybe I'll wire two different tone knobs with different capacitor values. I never use the volume knob.

Position 1: Blend
Position 2: Neck pickup to blend, bridge disconnected. Blend functions as volume.
Position 3: Pickups in series to blend knob. Blend should function as volume.
IMG_20161001_095616.jpg
IMG_20161001_095600.jpg
 
Here's my new bridge cut from a piece of the Eko fretboard. I cut it oversize and then put it in place and scrolled it to the contour of the bass by using a red pencil and spacer (plastic chisel tip cover) to hold the pencil tip several mm above the bass body. I shaped it roughly to the line with chisel and files. I then put a piece of sandpaper on the bass and moved the bridge back and forth along the string axis (because the contour of the top doesn't change much in that direction). I kept the sanding as close as I could to the area where the bridge will actually sit. The hardest part was cutting the bridge to rough shape since this wood is very hard to cut with a hand saw or chisel. Then some filing on the visible faces, followed by wet sanding and tru oil. I went for a selmer guitar look (django) with a really wide bridge. One problem is the piece is thinner than I'd like so I'll have to be careful when stringing it that the bridge doesn't fall over. It ended up fitting nicely against the body. Again, the photos are out of order.
IMG_20161002_112702.jpg
IMG_20161002_112641.jpg
IMG_20161002_112619.jpg
IMG_20161002_112611.jpg
IMG_20161001_181252.jpg
 
I seem to have lost any thread followers ;)
I'm posting this for posterity anyway more for my benefit. I'd sure appreciate any comments though on my wiring diagram (whether it will work) before I try and wire it. It's complicated so if it doesn't work I'm not sure how I'll trouble shoot the wiring.
 
Years ago, I bought a bass from Fat Dawg at Subway guitars that was very similar to this. It was an Eko fiddle body with a P neck bolted to it. It had one J pickup. It sounded amazing! I'm pretty sure the wooden bridge was key.

I did some recording with it and it sounded great in the studio. I eventually sold it back to Fatty. He probably took it apart repurposed the parts.

image2big.gif
 
Last edited:
  • Like
Reactions: Will_White
Years ago, I bought a bass from Fat Dawg at Subway guitars that was very similar to this. It was an Eko fiddle body with a P neck bolted to it. It had one J pickup. It sounded amazing! I'm pretty sure the wooden bridge was key.

I did some recording with it and it sounded great in the studio. I eventually sold it back to Fatty. He probably took it apart repurposed the parts.

image2big.gif
Nice! Post some of the recording of you've got it. Would love to hear it.
 
I seem to have lost any thread followers ;)
I'm posting this for posterity anyway more for my benefit. I'd sure appreciate any comments though on my wiring diagram (whether it will work) before I try and wire it. It's complicated so if it doesn't work I'm not sure how I'll trouble shoot the wiring.

I'm still around. Just been a crazy few days, and I have a lot of LC posts to catch up on.

As far as the wiring, I've not tried a setup like this. The diagram looks good to me from the idea I have of how it should work.

-Jake
 
QUOTE="RBS_Johnson, post: 19260219, member: 252092"]I'm still around. Just been a crazy few days, and I have a lot of LC posts to catch up on.

As far as the wiring, I've not tried a setup like this. The diagram looks good to me from the idea I have of how it should work.

-Jake[/QUOTE]

I posted the wiring separately and somebody gave me a better schematic. Great community this talk bass!