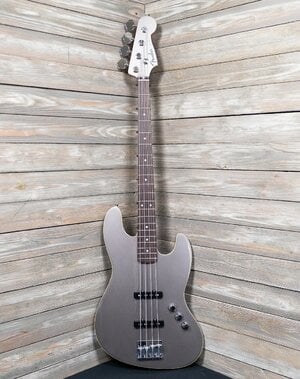
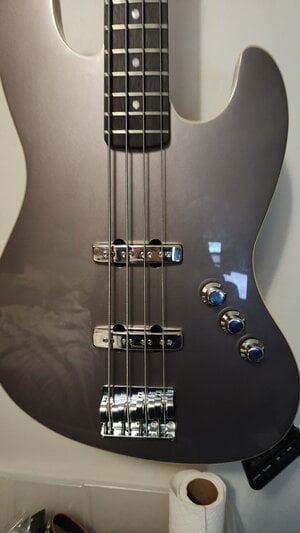
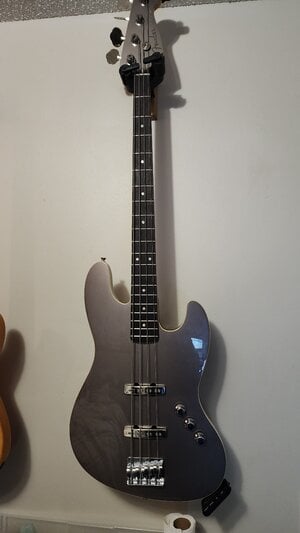
Jazz Bass Pickup Routing - Fender Aerodyne Carved Top

Hello. This is my first post. I'm 42, been playing guitar on and off since I was a kid but recently got back into Bass while recovering from a surgery. Bass fits my meat hook fingers much better and I'm loving it.

I picked up a Dolphin Grey MIJ Fender Aerodyne as my 2nd bass, first quality bass. Once I found the right strings (DR Hi Beams) I love it.

The stock pickups are great and I'd use them in another bass but they are pretty traditional and I want this to be a 100% modern bass, pickups included.

I picked up some EMG J set. I returned because they didn't come close to fitting in the pickup cavities. I might have had trouble fitting the 9v battery but It was close. I was gonna get mini pots of necessary. I gave up on the active pickup idea. I summary I learned the pickup cavities are tighter than most basses. I performed all measurements with a mitiyoto calipers but I didn't count on one thing I couldnt measure and didn't have dimensions for in the pickup dimensions drawings.

I found the DiMarzio Relentless Jazz Bass set which are a better fit to keep this Jazz Bass passive with a more modern pickup tone. All measured dime skins od the pickups fit *except* for the radius of the pickup outline corners. The screw tabs fit fine unlike the EMGs.

I have a nice plunge router and have routed cavities on a traditional tele. The cavities are obviously covered by a pickguard so cosmetics and being clean wasn't a priority. In this case, there is no pickguard and the pickups cavities are totally exposed. Making things even more difficult is the subtle carve top of this model jazz bass.

All I need is a smaller radius cut in the 4 corners of the pickup cavity. Is it even worth getting router templates or should I get a file of the proper radius? Literally only the very center of each corner hit my pickup cavities by about .015".

I found some dimensions of the pickup cavity radius for some jazz bass pickups. It was 0.79". This roughly equates to a 3.2mm diameter file. I think this file and being very careful and slow might be my best path forward.


I love this bass so I will take to a shop but I am capable and a very experienced hands on DIY'er. It's a basswood body so that is fairly soft for a tonewood.

If I use a 3mm wood file, how to I avoid chipping the paint other than masking tape? If worst case scenario I chip the paint, can You buy Fender colors? Metallic Dolphin Gray is the color I would need.
 

Attachments

  • SmartSelect_20240108_131834_Reverb.jpg
    SmartSelect_20240108_131834_Reverb.jpg
    1.1 MB · Views: 18
Last edited:
Hello. This is my first post. I'm 42, been playing guitar on and off since I was a kid but recently got back into Bass while recovering from a surgery. Bass fits my meat hook fingers much better and I'm loving it.

I picked up a Dolphin Grey MIJ Fender Aerodyne as my 2nd bass, first quality bass. Once I found the right strings (DR Hi Beams) I love it.

The stock pickups are great and I'd use them in another bass but they are pretty traditional and I want this to be a 100% modern bass, pickups included.

I picked up some EMG J set. I returned because they didn't come close to fitting in the pickup cavities. I might have had trouble fitting the 9v battery but It was close. I was gonna get mini pots of necessary. I gave up on the active pickup idea. I summary I learned the pickup cavities are tighter than most basses. I performed all measurements with a mitiyoto calipers but I didn't count on one thing I couldnt measure and didn't have dimensions for in the pickup dimensions drawings.

I found the DiMarzio Relentless Jazz Bass set which are a better fit to keep this Jazz Bass passive with a more modern pickup tone. All measured dime skins od the pickups fit *except* for the radius of the pickup outline corners. The screw tabs fit fine unlike the EMGs.

I have a nice plunge router and have routed cavities on a traditional tele. The cavities are obviously covered by a pickguard so cosmetics and being clean wasn't a priority. In this case, there is no pickguard and the pickups cavities are totally exposed. Making things even more difficult is the subtle carve top of this model jazz bass.

All I need is a smaller radius cut in the 4 corners of the pickup cavity. Is it even worth getting router templates or should I get a file of the proper radius? Literally only the very center of each corner hit my pickup cavities by about .015".

I found some dimensions of the pickup cavity radius for some jazz bass pickups. It was 0.79". This roughly equates to a 3.2mm diameter file. I think this file and being very careful and slow might be my best path forward.


I love this bass so I will take to a shop but I am capable and a very experienced hands on DIY'er. It's a basswood body so that is fairly soft for a tonewood.

If I use a 3mm wood file, how to I avoid chipping the paint other than masking tape? If worst case scenario I chip the paint, can You buy Fender colors? Metallic Dolphin Gray is the color I would need.
When you buy pickups, you have to make sure you buy Fender sizes. The neck pickup is smaller than the bridge.

Besides that, I've never encountered an issue with the set screws. Usually, the cases end up being a little wider than the stock set, and you have to hit it with a dremel real quick on the bar sides.

If you want it modern, buy Delanos.
 
I have full-size routers, but for small work, I like to "work small." When I had to expand the pickup cavities on my old #1 (with a similar "piano black" finish as the Aero), I used painter's tape to mask off any part of the surface the router could contact, and used a Dremel router attachment and bit so I could control it better - with fingertip movements close to the work, rather than hands further away.

Internet pic, since I didn't take one of the attachment, but you can see how much smaller this is than a conventional plunge, or even a trim router:

https://img.joomcdn.net/4781ce162551cd8c1cf7ea5318a38e09ccc519a9_original.jpeg


I left the tape in place, then used the same Dremel attachment and setup with a straight-sided sanding bit to clean up the sides and curves of the cavities. With the tape there, the edges were sanded clean along with the wood. That made it easy to then rattle-can the cavities with some flat black I had sitting around, just to seal up the wood. Once the paint was dry, I pulled off the tape, and dropped in the new pickups (Seymour Duncan Quarter-Pounders with their earlier "BassLines" logo).

Pickup Routing-win.jpg


I'm nobody's idea of a luthier, but this turned out well enough, I'm good with it. 😄

Good luck! :thumbsup:
 
Last edited:
if the issue is with the corners of the pickup routings not being quite sharp enough for the Dimarzios, my approach would probably be to just sand the corners of the pickup covers a bit to round them off a bit more, rather than attempting to route the body. If this is one of the Aerodynes with the arched top, it would be pretty tough to get most of the routing templates to work, I would think...
 
Hello. This is my first post. I'm 42, been playing guitar on and off since I was a kid but recently got back into Bass while recovering from a surgery. Bass fits my meat hook fingers much better and I'm loving it.

I picked up a Dolphin Grey MIJ Fender Aerodyne as my 2nd bass, first quality bass. Once I found the right strings (DR Hi Beams) I love it.

The stock pickups are great and I'd use them in another bass but they are pretty traditional and I want this to be a 100% modern bass, pickups included.

I picked up some EMG J set. I returned because they didn't come close to fitting in the pickup cavities. I might have had trouble fitting the 9v battery but It was close. I was gonna get mini pots of necessary. I gave up on the active pickup idea. I summary I learned the pickup cavities are tighter than most basses. I performed all measurements with a mitiyoto calipers but I didn't count on one thing I couldnt measure and didn't have dimensions for in the pickup dimensions drawings.

I found the DiMarzio Relentless Jazz Bass set which are a better fit to keep this Jazz Bass passive with a more modern pickup tone. All measured dime skins od the pickups fit *except* for the radius of the pickup outline corners. The screw tabs fit fine unlike the EMGs.

I have a nice plunge router and have routed cavities on a traditional tele. The cavities are obviously covered by a pickguard so cosmetics and being clean wasn't a priority. In this case, there is no pickguard and the pickups cavities are totally exposed. Making things even more difficult is the subtle carve top of this model jazz bass.

All I need is a smaller radius cut in the 4 corners of the pickup cavity. Is it even worth getting router templates or should I get a file of the proper radius? Literally only the very center of each corner hit my pickup cavities by about .015".

I found some dimensions of the pickup cavity radius for some jazz bass pickups. It was 0.79". This roughly equates to a 3.2mm diameter file. I think this file and being very careful and slow might be my best path forward.


I love this bass so I will take to a shop but I am capable and a very experienced hands on DIY'er. It's a basswood body so that is fairly soft for a tonewood.

If I use a 3mm wood file, how to I avoid chipping the paint other than masking tape? If worst case scenario I chip the paint, can You buy Fender colors? Metallic Dolphin Gray is the color I would need.

The easiest approach is just what you are describing: Hand file the corners to bring them to the smaller radius that you need. A straight round file of about 3mm or 5/32" diameter. Hold it vertical, cutting only on the downward direction. Take your time, keep checking it with a pin or a radius gauge or a spare pickup cover as you go. Very little wood needs to be removed. It won't take long. Be patient and don't go too deep into the corner.
 
Those Stewmac templates look excellent, hadn’t seen the ones with corner drill bit guides. That’s really difficult to do accurately without templates. In your shoes I might put 3-4 layers of tape on the inside edge of template openings, hog out the bulk with forstner bits, and then edge-route around the perimeter, taking one layer of tape off for each pass, so you are only taking a few .000” each pass. I think I’d score the pup outline with an xacto first, to give the paint a line to shear off at. Still, it’s a little risky on a painted bass. Matching the exact Fender Dolphin grey could be tough. Filing in downstrokes only will work, but take a long time. That’s probably the “safest” option.
 
  • Like
Reactions: Beej
Come on, guys. He needs a small simple correction that can be done in a few minutes with a hand file. Basic hand tool skills. There's no reason to make it any more complicated than that.
Thanks for the replies everyone. Right now I would only consider a router if the pockets aren't deep enough for the amount of adjustment I want. I probably wouldn't even do that because of the carve top. I would have to 3d print templates that are curved. For that I would be challenging my Solidworks skills.

Based off these responses I will probably stick to filing the corners of the pockets. Slowly and downward strokes only. Cover up around the cavities with painters tape. The 3mm file just shipped so I'll check back in a week, hopefully with pics.
Those Stewmac templates look excellent, hadn’t seen the ones with corner drill bit guides. That’s really difficult to do accurately without templates. In your shoes I might put 3-4 layers of tape on the inside edge of template openings, hog out the bulk with forstner bits, and then edge-route around the perimeter, taking one layer of tape off for each pass, so you are only taking a few .000” each pass. I think I’d score the pup outline with an xacto first, to give the paint a line to shear off at. Still, it’s a little risky on a painted bass. Matching the exact Fender Dolphin grey could be tough. Filing in downstrokes only will work, but take a long time. That’s probably the “safest” option.
I don't think I want to mess this up with a router. There is no room for error unlike a Tele neck pickup. I suppose Fender doesn't want to sell their paints because special colors are one reason people with GAS buy more guitars and basses.
If you have a 3d printer. I believe a few guys have routing template files. I'll check when I home. I think I made a few.
I wouldn't mind having those. Hopefully I never have to use them.
 
You've got your solution, so it's all good, but just to continue a thought for the theoretical heck of it... 🤓

I don't think custom-curved templates would be required, regardless of the surface, because the cavities for the pickups themselves are likely to have straight sides. Curving a template might make it mate up to the surface, but using it to guide a router along that curved surface would tilt the bit, and result in a flared cavity, wider at the top than at the bottom.

If I were going to use a template on my Aero, I'd mask off the surface, then take a small straightedge and make sure the inside of the template was square to the inside of the cavity; Then, using something like small strips of cardboard (from the back of a notepad, etc.), I'd "shore up" the ends of the template where the surface curves away to keep it from wobbling, and tape it all down firmly.

Securely in place and straight to the cavities, then - theoretically - the router could work.

But as I also noted above: "Working small" is good, so if you can do it with a file, so much the better. I had to take a good bit of material out of my old #1 to make the QP's fit, but if that was more than you need to do, I'm sorry for my part in kicking off the bull-in-a-china-shop festival. 🤪😅

:thumbsup:
 
Last edited:
You've got your solution, so it's all good, but just to continue a thought for the theoretical heck of it... 🤓

I don't think custom-curved templates would be required, regardless of the surface, because the cavities for the pickups themselves are likely to have straight sides. Curving a template might make it mate up to the surface, but using it to guide a router along that curved surface would tilt the bit, and result in a flared cavity, wider at the top than at the bottom.

If I were going to use a template on my Aero, I'd mask off the surface, then take a small straightedge and make sure the inside of the template was square to the inside of the cavity; Then, using something like small strips of cardboard (from the back of a notepad, etc.), I'd "shore up" the ends of the template where the surface curves away to keep it from wobbling, and tape it all down firmly.

Securely in place and straight to the cavities, then - theoretically - the router could work.

But as I also noted above: "Working small" is good, so if you can do it with a file, so much the better. I had to take a good bit of material out of my old #1 to make the QP's fit, but if that was more than you need to do, I'm sorry for my part in kicking off the bull-in-a-china-shop festival. 🤪😅

:thumbsup:
Yeah that is a good point. Their CNCs don't tilt the but like a curved temple would.

I'll leave the routing for another day or another project. Something with a pickguard. Or for building a cabinet for my Princeton Reverb Chassis but that's another thread. I fear the Tolex so I'll probably go with Mojotone.
 
You've got your solution, so it's all good, but just to continue a thought for the theoretical heck of it... 🤓

I don't think custom-curved templates would be required, regardless of the surface, because the cavities for the pickups themselves are likely to have straight sides. Curving a template might make it mate up to the surface, but using it to guide a router along that curved surface would tilt the bit, and result in a flared cavity, wider at the top than at the bottom.

If I were going to use a template on my Aero, I'd mask off the surface, then take a small straightedge and make sure the inside of the template was square to the inside of the cavity; Then, using something like small strips of cardboard (from the back of a notepad, etc.), I'd "shore up" the ends of the template where the surface curves away to keep it from wobbling, and tape it all down firmly.

Securely in place and straight to the cavities, then - theoretically - the router could work.

But as I also noted above: "Working small" is good, so if you can do it with a file, so much the better. I had to take a good bit of material out of my old #1 to make the QP's fit, but if that was more than you need to do, I'm sorry for my part in kicking off the bull-in-a-china-shop festival. 🤪😅

:thumbsup:

Yes, I completely agree. I've routed pickup and control cavities in curved-top bodies many times, and the normal process is to use a flat routing template. Wood spacer blocks are fitted under the edges of the template, seating on the body perimeter. The template is clamped down securely at the edges, barely touching the center of the curved top. The pocket is routed the normal way, using a flat router base on the template. The pocket is routed straight-sided.

I don't know why you would want or need a curved template.
 
  • Like
Reactions: Winslow
I made a "curved" template once by putting small balls of epoxy putty in the 4 corners of the template, and then squashing it down onto the body with a sheet of wax paper "release" under it. it worked, but yeah... fiddly. Bruce's method is quicker and easier.
 
  • Like
Reactions: Winslow
if the issue is with the corners of the pickup routings not being quite sharp enough for the Dimarzios, my approach would probably be to just sand the corners of the pickup covers a bit to round them off a bit more, rather than attempting to route the body. If this is one of the Aerodynes with the arched top, it would be pretty tough to get most of the routing templates to work, I would
if the issue is with the corners of the pickup routings not being quite sharp enough for the Dimarzios, my approach would probably be to just sand the corners of the pickup covers a bit to round them off a bit more, rather than attempting to route the body. If this is one of the Aerodynes with the arched top, it would be pretty tough to get most of the routing templates to work, I would think...
Its actually pretty easy. Double sided tape a wood shim to each side to make sure the template sits flat, then use double sided tape to attach to the body. Route. Voila ! :)
 
  • Like
Reactions: Gilmourisgod
Pickups installed. I slowly filed down the 8 corners of the pickup pockets with the 3m. File. These are deep pickups so I had to go with half the normal depth of jazz bass pickup foam.

This is now a truly modern Jazz Bass now. Now it's time to get a Vintage Model. I'm looking at a Tokai era mid 90's Japanese 62 reissue.
 

Attachments

  • 20240822_100312.jpg
    20240822_100312.jpg
    2.7 MB · Views: 10
  • 20240822_100306.jpg
    20240822_100306.jpg
    2 MB · Views: 8
Pickups installed. I slowly filed down the 8 corners of the pickup pockets with the 3m. File. These are deep pickups so I had to go with half the normal depth of jazz bass pickup foam.

This is now a truly modern Jazz Bass now. Now it's time to get a Vintage Model. I'm looking at a Tokai era mid 90's Japanese 62 reissue.


Looks good. How do the Relentless pickups sound?