Scarf Joint router sleds...

Hi,

I'm wondering if I could see links or pics of your Scarf joint router sleds?
I'm looking to make 2 (one 7 degree, and another 10).

I'm looking do two things. I understand I'll have to make 2 router sleds.

On one neck complete out a 7 degree angle on one neck.. Was cut with a band saw, and an attempt to manually angle it came out ok, but the angle wasn't great (done on a flat sled, and eyeballing the angle)..

On another easier blank, cut a 10 degree angle on a band saw, then complete out on a new sled.

Here's one link I found:

Do you cut scarf joints by hand or with powertools?

Thanks for sharing :)
 
sorry, no sled for me. i cut them by hand with a Dozuki saw and then mill the glue surfaces with a milling machine and a Wagner safety plane.

if you want to make a sled why not make one with interchangeable pieces or some form of adjustment for your different angles?
 
Here's yet another interesting option I found to get the scarf cut initially:


But, I'd still need to sand..

My 10" band saw came with a mitre guide, but I've never used it, and I think it's not as precise looking as the one in this video. Conceptually the same as table saw jigs/guides.

I have no doubts that a router sled would produce a finer surface on first pass than a band saw.
 
I don't use scarf joints often, but when I do I cut them in one of my normal router planing fixtures. I think there's a picture of me cutting an angled top headstock surface in the Router Planing Fixtures thread. The blank is clamped in the fixture, with the long length hanging out the end and down. Nothing really special about the setup. Figure out the angle, rough cut the excess on the bandsaw, line up the pencil lines in the fixture, cut the surface flat with the router.

You've seen that clever setup that Mapleglo uses, with the Workmate and the pair of beams? That would work fine, too.


Cool! I’ll look at your thread again. I was trying to get something like what Mapleglo uses with a workmate and beams, but couldn’t get it solidly dialed in at the correct angle... parts were in my way for the ideal visual/confirmation.
 
I don't use scarf joints often, but when I do I cut them in one of my normal router planing fixtures. I think there's a picture of me cutting an angled top headstock surface in the Router Planing Fixtures thread. The blank is clamped in the fixture, with the long length hanging out the end and down. Nothing really special about the setup. Figure out the angle, rough cut the excess on the bandsaw, line up the pencil lines in the fixture, cut the surface flat with the router.

You've seen that clever setup that Mapleglo uses, with the Workmate and the pair of beams? That would work fine, too.


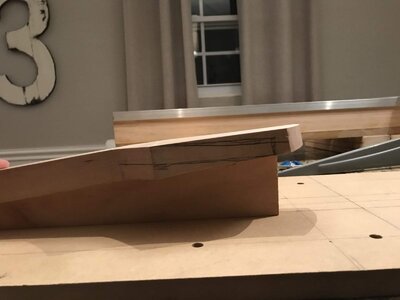
Here are a few @mapleglo inspired angles at 7 degrees (not perfect yet):

CB589BA0-B9E5-4DD9-A448-CF0DFC136C94.jpeg


Could probably pin it down here and add rails then hit the top...

7A6F9B39-10F8-476F-ACCD-8861FA96D4CB.jpeg


Or I was trying to work it into my Bruce inspired sled:

373F64DF-6CDA-46FC-BF45-D5F6733274CC.jpeg


Kinda tricky to pin down given I cut the neck shape already.

I was digging thru some of my stuff and found these 10 degree closet maid shelf ends. They may come in handy one day.

12B8608F-8C4B-461D-BEED-DC2E205148B0.jpeg


I kind of think it would be great to have an adjustable jig that just raises up on one side for the angle and the bottom sliding back and the rails just going up and down to adjust height. Hmmmm

By the way for one neck I’m shaping the faces angle. Not sure if I mentioned it on this thread.
 

Attachments

  • DD96B4D3-84F4-447C-8FA2-C8E05AC2D324.jpeg
    DD96B4D3-84F4-447C-8FA2-C8E05AC2D324.jpeg
    70.1 KB · Views: 39
  • Like
Reactions: mapleglo
I cut the headstock angle as my first step after gluing up the neck blank. It's easier to clamp it into the jig when it's just a rectangular piece of wood.

Thanks Mapleglo :)

Yeah, i realized it's way easier clamp/level it with a neck blank.. For this, I'm figuring out how to pin it flush to the angle ramps. With my lam blank, I'm either going to decide on a different angle, and do that after I glue it up. My thickness is 1 1/4 inch for that blank.. Then there's a scarf or not...Hmm...At least I'm learning for future builds :) thanks!
 
  • Like
Reactions: mapleglo
This is the contraption I use for the headstock angle:
IMG_20170926_130032.jpg


It can be adjusted in any angle from 0 to about 20 degrees using the thumbscrews, and it provides a flat surface for a large router base. You can't really use it for the cut of the scarf joint, but it's perfect for flattening the surface under an angle. The idea is you clamp the neck from the bottom by tightening the nuts on that metal plate-thingy in the middle and regular clamps further on up the neck. So in theory you can still use it pretty far into the build, even with the neck shaped or glued up fingerboard, as long as there's no radius or frets yet.
Here's a pic with a neck blank in it, and with a router and acrylic router base.
DSC01039a.jpg
 
`
This is the contraption I use for the headstock angle:View attachment 2764646

It can be adjusted in any angle from 0 to about 20 degrees using the thumbscrews, and it provides a flat surface for a large router base. You can't really use it for the cut of the scarf joint, but it's perfect for flattening the surface under an angle. The idea is you clamp the neck from the bottom by tightening the nuts on that metal plate-thingy in the middle and regular clamps further on up the neck. So in theory you can still use it pretty far into the build, even with the neck shaped or glued up fingerboard, as long as there's no radius or frets yet.
Here's a pic with a neck blank in it, and with a router and acrylic router base.View attachment 2764645

Thanks Hout for posting this neat jig!
I like the ability to dial in different angles.
My mind is now pondering :)

Those two boards in the middle, they glued together then the pivot hole drilled in the middle? Or sandwiched in between? Just curious about that part.
 
I used a round bit to route two parallel channels for the threaded rods in one of the boards. Just deep enough for the rods to be snug, without bending the boards when I screwed them together. A long hole drilled straight through a thicker board would also do the job, or maybe even two screws on each side, but when I made id I figured this would be the easiest way to get a proper alignment of the pivot point.
 
  • Like
Reactions: chinjazz
I used a round bit to route two parallel channels for the threaded rods in one of the boards. Just deep enough for the rods to be snug, without bending the boards when I screwed them together. A long hole drilled straight through a thicker board would also do the job, or maybe even two screws on each side, but when I made id I figured this would be the easiest way to get a proper alignment of the pivot point.

Cool thanks! I think routing channels would be more precise. Or even putting a half round bracket thing around a beam on the bottom might work (mainly as a hindge to pivot off of)
 
I cut the headstock angle as my first step after gluing up the neck blank. It's easier to clamp it into the jig when it's just a rectangular piece of wood.


I realized I didn’t want to make a new jig for this immediate need, so I used the two 7 degree angles from yesterday and used it as a center platform for the neck then figured a way to secure it all

6AF1D2FE-3DD1-4FEA-80EA-6B523D2CA2ED.jpeg


And I’m good....

346DE727-FE04-4093-A34A-4D2E02CCF0CD.jpeg


Thanks for the help!
 
just a suggestion, but at some point you might want to consider making an acrylic (or other material) fret board template. fwiw, i generally don't start tapering the neck or work on the FB before i have made one. with it you can center your FB to the truss rod slot (using dowels) and place the fret board locating pins in the correct locations on the neck and FB. you can also use the same FB locating pins to center the fretboard in your fret slotting fixture as well.
 
Last edited:
  • Like
Reactions: chinjazz
just a suggestion, but at some point you might want to consider making an acrylic (or other material) fret board template. fwiw, i generally don't start tapering the neck or work on the FB before i have made one. with it you can center your FB to the truss rod slot (using dowels) and place the fret board locating pins in the correct locations on the neck. you can also use the same FB locating pins to center the fretboard in your fret slotting fixture as well.

Thanks that sounds like a great idea!
Might you have any pics or links of this idea?