The EDGE TOOL Thread

Christopher DBG

Commercial User
May 18, 2015
883
2,931
4,916
58
Westerly, RI
www.smithcreekmandolin.com
Disclosures
Luthier/Owner, Christopher Bass Guitar
I thought a thread discussing edge tools might be useful. Hopefully this thread can be a source of information and inspiration on all aspects from buying, tuning, sharpening and using, everything from scrapers and chisels to knives and hand planes.

So, if you use edge tools on your build and have info to share please post! If you would like to use edge tools and have questions hopefully we can make this thread a good place to ask.

I'm a big fan of edge tools for a couple simple reasons. They are frequently faster and at least as accurate if not more accurate than machines with less danger of destroying your work in progress with one small slip. The most frequently used tool used in my shop is a #8 hand plane. To get the thread going I'll post a few pictures of what I'm using that plane for on my most recent builds.

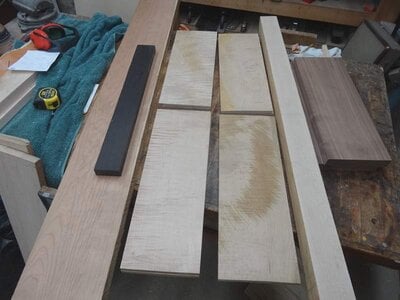
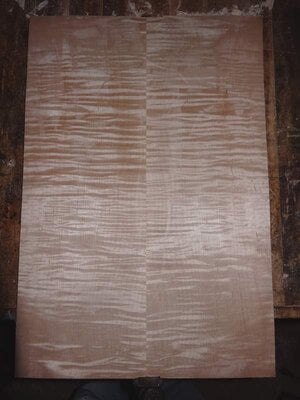
This is some of the lumber used on two basses I'm currently building:
DSC03067.JPG

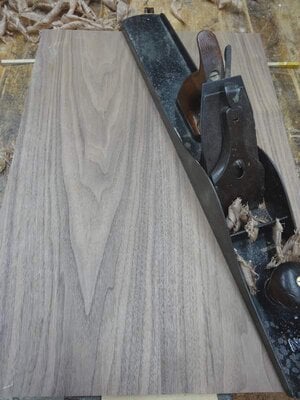
Walnut body blank after joining being planed flat:
DSC03068.JPG

The same joining and flattening was done for the top and back plates.
DSC03078.JPG

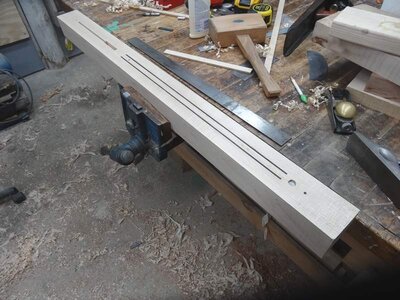
Two necks were cut out of this blank, even after running across a joiner, both faces of the neck blank were planed "more flatter" using the #8 and a straightedge:
DSC03080.JPG

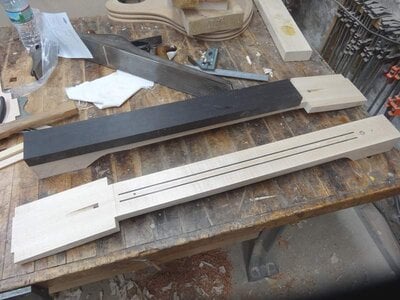
After rough cutting on the band saw the peg-head angle is refined with the #8. First step is measure precisely where the angle starts and scribe a line across the shaft with a square and knife. Draw the peghead angle on one side of the blank. Then plane the peghead right up to both lines. If your angle gets off a bit in either direction (too much on one side or too steep or shallow an angle) just take a few more strokes off the other side or one end. If you've ever done this with a sanding block you will be amazed how fast and easy a plane makes the job. The #8 was also used to flatten the ebony before cutting pieces off for fingerboards.
DSC03083.JPG
 
Great thread from a true craftsman! Recently I've been getting more into hand tools and in my most recent endeavor I'm trying to use them exclusively. Although I used my bandsaw to resaw a bunch of tops, backs and cores.

The problem I always seem to have is keeping my hand planing flat or square. It always seems to bias to one side. This happens even after I've checked the thickness of shaving on both sides of the iron using thin scrap. For neck blanks I just go one direction, then back the other way and it all works out in the end but it'd be nice to figure out what I'm doing wrong.

Looking forward to more posts on this!
 
Smithcreek,
Thanks for starting this thread, I tend to rely on machine tools and have had the nasty scares and destruction of good lumber that accompanies amateur woodwork. I'd be particularly interested in sharpening techniques, always my achilles heel. I've been using "scary sharp" sandpaper adhered to float glass, but I find it hard to get a consistently sharp, durable edge on chisels, even with a Veritas guide. The edge always seems to gradually wander away from square too. I do own a couple small block planes, but don't use them much, as I rely on my 6" Jet jointer and 12.5" Delta planer. They work pretty well, but the planer always seems to leave a little tearout or snipe. Sub'd!
 
  • Like
Reactions: BassHappy
Subb'd oh so very much!

I am currently gearing up towards starting my first build. Due to space limitations, I will rely mostly on hand tools (and also because I can't afford the big machines. And because I may be a tiny bit scared of them...) Any info you can provide here will be greatly appreciated!
 
Recently I've been getting more into hand tools and in my most recent endeavor I'm trying to use them exclusively. Although I used my bandsaw to resaw a bunch of tops, backs and cores.

The problem I always seem to have is keeping my hand planing flat or square. It always seems to bias to one side. This happens even after I've checked the thickness of shaving on both sides of the iron using thin scrap. For neck blanks I just go one direction, then back the other way and it all works out in the end but it'd be nice to figure out what I'm doing wrong.

Looking forward to more posts on this!

I did the same thing on a batch of 12 mandolins once and learned a lot. Same as you, I was not about to give up my bandsaw. Cutting a dovetail or some other joint is good to learn by hand, but I couldn't see the value of resawing by hand. On that batch of mandolins I think the only place I used sandpaper was on the headstocks. Everything else was scraped. They turned out to have a really cool look, like an old violin, with the deep reed, where you can see and feel the grain lines on the top.

As far as you plane goes, first thing, has it been "tuned up" since you bought it? Has the sole been lapped flat, mouth filed, bed and frog lapped? I'll take a look around, I think I have a book I can scan that goes through the process. It's probably easy to find on the internet also. What's your sharpening process?

Keeping level side to side can be a pain, especially when you are having a tough time getting it perfectly straight the length of the board, and once do you realize that you put an angle on it! If the edge you are planing is 3/4" or less, just applying a little more pressure can put an angle on it.

To make sure it's not the blade just being off angle the usual steps are make sure your blade is very sharp, hold the plane upside down and and eyeball it as close even as you can as you retract the blade into the throat. Then adjust it so it takes the thinnest cut possible. If it's only cutting on one side, adjust the blade, retract it, and try again until you get it cutting across the width of the blade.


Smithcreek,
Thanks for starting this thread, I tend to rely on machine tools and have had the nasty scares and destruction of good lumber that accompanies amateur woodwork. I'd be particularly interested in sharpening techniques, always my achilles heel. I've been using "scary sharp" sandpaper adhered to float glass, but I find it hard to get a consistently sharp, durable edge on chisels, even with a Veritas guide. The edge always seems to gradually wander away from square too. I do own a couple small block planes, but don't use them much, as I rely on my 6" Jet jointer and 12.5" Delta planer. They work pretty well, but the planer always seems to leave a little tearout or snipe. Sub'd!

There's a good book you can get cheap here:http://www.alibris.com/booksearch?keyword=leonard+lee+sharpening&mtype=B&hs.x=0&hs.y=0

It's a good book to have as a reference, but there are really only a few things you need to know to sharpen most common tools, and then apply that to the specific tool. I posted about making flexible scrapers and that covers just about every standard step whether it's a plane blade, chisel or scraper. What brand of chisels do you have? The steel used in them can be very different from one brand to another and that makes a huge difference in how they take and hold an edge. I usually recommend the Marples Blue Chip set with 5 chisels from 1/4" - 1", plus buy a 1/8". Those are great chisels for the price.

Getting off square is standard, especially on narrower chisels. A couple questions: Are you sharpening with a double bevel? What are you using to grind the primary bevel? If you don't have a coarse diamond stone that's worth the money. The bigger the better, but a 2" x 7" will do. You can fairly quickly put a new bevel on the blade and correct the out of squareness. The Veritas guide works well, especially for the initial bevel. After a while you will probably find yourself using it less, especially when you just want to quickly resharpen/touch up the blade.

The block planes needs the same tune up as any bench plane.

Subb'd oh so very much!

I am currently gearing up towards starting my first build. Due to space limitations, I will rely mostly on hand tools (and also because I can't afford the big machines. And because I may be a tiny bit scared of them...) Any info you can provide here will be greatly appreciated!

I'm hoping others people will answer also. Sharpening and using edge tools is truly one of those "hundred ways to skin a cat" things and I'm always looking for ideas!
 
  • Like
Reactions: BassHappy
I have the Marples chisels with the blue plastic handles. I'll post some photos of how they kook at the edge. The Veritas guide I have is fine for establishing the angle, but it doesn't have any built in way to square it to the blade, which seems like a design flaw.
 
As far as you plane goes, first thing, has it been "tuned up" since you bought it? Has the sole been lapped flat, mouth filed, bed and frog lapped?

I have two Groz planes, a 4 and a 5, that I spent a total of about 8-10 hours flattening the sole and getting the frog to a somewhat acceptable point. The soles were incredibly messed up with lumps and waves. I didn't know what to look for when I got them, I just saw a #5 for $70 and jumped on it. It took about 3 hours just to get the sole flat without over heating the metal.

For Christmas this year a few family members pitched in and got me a lie Nielsen 4 1/2 (I was a really good boy this year!) and it's like stepping into a Ferrari after the Groz planes.

On all my edge tools I use the big fancy veritas guide with sand paper on a granite block up to 1500 then I go to a strope. I also lapped the chip breakers on my lesser planes so they mate with the blade better.

For setting the blade side to side I take a thin soft piece of scrap and use one side of the blade, then the other until the shavings are as identical as I can tell.

I'm wondering if the "squareness" will just come with practice. I saw rob cosman at my local woodcraft one day and asked him about it. He said he has his students stand a board on edge up against a bench dog and then has them plane the edge. He said it's a great way to learn how to plane with even pressure side to side (otherwise the board would fall over if that wasn't clear). He's probably right, just wondering if anyone else has tricks up their sleeve.
 
It took about 3 hours just to get the sole flat without over heating the metal.

For Christmas this year a few family members pitched in and got me a lie Nielsen 4 1/2 (I was a really good boy this year!) and it's like stepping into a Ferrari after the Groz planes.

I'm wondering if the "squareness" will just come with practice.

Lapping the sole is definitely not fun. I remember counting the strokes back and forth and making myself do at least 200 before looking to see if I made any progress. That Lie Nielsen though, nice! I have one small rabbet block plane and one very small scraper plane by them. The tune up for those is simple: remove from box, hone the edge, use!

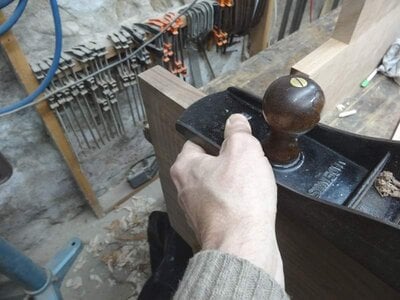
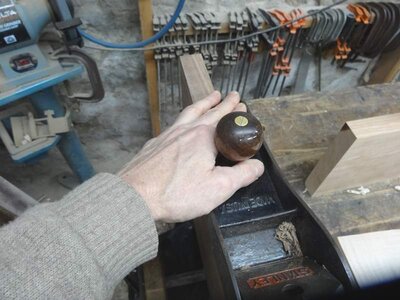
Yes, the squareness does come with practice, and here are a couple things to try if you don't do them already. First, when you are joining an edge, don't use the front knob. You just can't get the balance you need. Take a look at the pic below and place you hand like that. With you hand like that you can use your fingertips and palm put even pressure on both sides of the plane, and if you find that yourself getting out of square towards one side, put a little more pressure on the other.

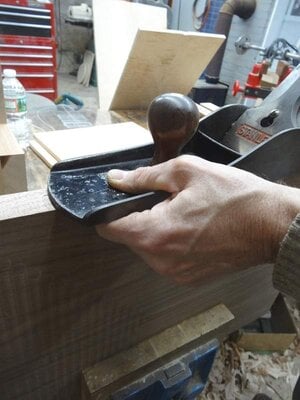
Next picture is if you already find you are out of square. Place your hand with your thumb wrapped around the edge and use your fingers as a fence against the wood. Then, tilt the plane just a hair by either pushing down with your thumb or by pressing your pointer finger against the board. It also helps to skew the plane a little bit, maybe 15 degress or so and either lift or press down a little on the rear handle. So, for example, if you needed to take some off the left side, pull down with your left hand thumb, lift with your right hand and guide the cut with your index finger. It's definitely easier said than done with just a little practice.
 

Attachments

  • DSC03089.JPG
    DSC03089.JPG
    91.3 KB · Views: 148
  • DSC03090.JPG
    DSC03090.JPG
    89.5 KB · Views: 142
  • DSC03091.JPG
    DSC03091.JPG
    83 KB · Views: 139
Here's my current sharpening "arsenal", collected over years of trying different techniques. In the lower left, I have some DMT diamond sharpeners, and a wood jig that gives me a place for the roller guides to run. In the middle I have a Veritas angle guide and a leather disc strop I chuck into my drillpress. In the upper right are two chisel roller guides, one no-name, and one Veritas.
In the bottom right I have a piece of float glass with a set of graduated papers from Rockler Tools. This side is coarse, with progressivley finer grits on the other side. In the upper left I have a super-fine Gold japanese waterstone I use for final polish. I think I trashed the coarse float glass grit trying to flatten it on the lower left. D'oh!
IMG_1162_zpshwp3tnom.jpg


I use the DMT stones only to re-grind a chipped edge, takes forever, but I don't have a bench grinder. I use the float glass for "scary sharp" technique. They definitely get scary sharp, but it's a very fragile edge that gets micro-chips in it and dulls quickly. The roller guides are frustrating, the one on the left has a "dovetail" notch in each side, supposedly to hold the chisel square, but it doesn't. The Veritas works well, but is has no provision to align the chisel to 90 degrees, and even with the thumbscrew tight on the blade, it tends to drift a little.

Here a shot of my biggest and smallest Marples blue handle chisel backs. I spent a good bit of time getting them flat, used to be a mirror polish, but it's dulled a little.
IMG_1163_zpskajbbpfp.jpg


And here's the front, 25 degree initial bevel, then a micro-bevel dialed in on the Veritas. I can shave hairs with these, but it doesn't last long.
IMG_1164_zpsewflayxc.jpg


Here's the 1/4" chisel that always seems to "wander" away from a 90 degree edge.
IMG_1165_zpstylsjkjx.jpg


I think I have all the right gear, just not the right technique. Advice appreciated!
 
The roller guides are frustrating, the one on the left has a "dovetail" notch in each side, supposedly to hold the chisel square, but it doesn't.

Those Eclipse style guides are often improved by a bit of modification, filing the lower jaws to fit your chisels better is definitely worth considering. Another issue I've found with them, is that the upper jaws tend to have a hump when tightened. I got this cheap guide free when I brought a diamond stone, this is the modification I made..


When the jaws are open, the surface where the blade/chisel sits is flat.

lvqW4R.jpg


However, when the jaws are tightened you'll see that the two halves gradually rise up as it's tightened. This 'hump' can cause the blade to become skewed in the guide.

yjM35N.jpg


To fix this, clamp the jaws shut and tighten with a screwdriver (don't over-tighten). Then use a file to level the surface (this particular guide had a thick coat of paint, which I scraped off first). They're normally made from a fairly soft alloy, so it shouldn't take long to file it flat.

Ge72AP.jpg
 
  • Like
Reactions: Gilmourisgod
IMG_1164_zpsewflayxc.jpg


Here's the 1/4" chisel that always seems to "wander" away from a 90 degree edge.
IMG_1165_zpstylsjkjx.jpg

I can't tell what I'm seeing in the picture. I can see the primary bevel, and maybe the secondary, but what is the very light line right at the end? Can you see it when you look at it or is it just from the camera?


Here's a link to a blog post I wrote last year about my sharpening method (using waterstones), it might be of interest to some of you: Sharpening a Plane Blade

Nice blog, great pictures, beautiful instruments!
 
  • Like
Reactions: Simo
Sorry for the crappy picture, I think that's my attempt at the microbevel you can get by rotating the cammed roller bearing on the Veritas guide. The fact that its not even means I've got it out of square. My biggest problems seem to be square and angle repeatability, seems I get it a tiny bit different every time.
 
Ok. If that very thin line is your secondary or microbevel, try taking it back farther. Are you using the chisels mainly for paring or chopping and prying? A 25 degree bevel with a very thin microbevel will fail immediately with any chopping and prying. If you get a pairing chisel or two you can set those up with a low angle and keep the blue chips a little steeper and they will take the abuse of chopping a lot better. A 1" and a 1/4" pairing chisel will take care of 90% of your needs. My 1" pairing chisel is the most used chisel in my shop.
 
Last edited:
  • Like
Reactions: BassHappy