First bass build - piezo fretless

So I have done the final coats of lacquer and sanded up to 1200 grit. She's ready for her final coat of satin lacquer...except one thing.

You see those really shiny areas in the area where the laser engraving is? The darker parts? Does anyone know how to make them less shiny/flatten them out? I'd like it to be a very matte finish, so that the surface imperfections/wobbliness isn't so evident in the light. Right now the satin lacquer really shows all the imperfections in the laser-etched dark area.

I've tried sandpaper but it doesn't really fit into the crevices. I was thinking maybe steel wool since it's more malleable/pliable and it might push itself into all the little nooks and crannies of the laser etched area, thus flattening it out. Or maybe there's some kind of chemical I can use? I am hesitant to use a chemical because I still want the non-laser etched areas to be shiny and I'm afraid I won't be able to control it, even if I masked it off.
IMG_0928 copy.jpg
 
So I have done the final coats of lacquer and sanded up to 1200 grit. She's ready for her final coat of satin lacquer...except one thing.

You see those really shiny areas in the area where the laser engraving is? The darker parts? Does anyone know how to make them less shiny/flatten them out? I'd like it to be a very matte finish, so that the surface imperfections/wobbliness isn't so evident in the light. Right now the satin lacquer really shows all the imperfections in the laser-etched dark area.

I've tried sandpaper but it doesn't really fit into the crevices. I was thinking maybe steel wool since it's more malleable/pliable and it might push itself into all the little nooks and crannies of the laser etched area, thus flattening it out. Or maybe there's some kind of chemical I can use? I am hesitant to use a chemical because I still want the non-laser etched areas to be shiny and I'm afraid I won't be able to control it, even if I masked it off.
View attachment 1089426
Not chemicals. 4-0 steel wool and a light touch
 
So I have done the final coats of lacquer and sanded up to 1200 grit. She's ready for her final coat of satin lacquer...except one thing.

You see those really shiny areas in the area where the laser engraving is? The darker parts? Does anyone know how to make them less shiny/flatten them out? I'd like it to be a very matte finish, so that the surface imperfections/wobbliness isn't so evident in the light. Right now the satin lacquer really shows all the imperfections in the laser-etched dark area.

I've tried sandpaper but it doesn't really fit into the crevices. I was thinking maybe steel wool since it's more malleable/pliable and it might push itself into all the little nooks and crannies of the laser etched area, thus flattening it out. Or maybe there's some kind of chemical I can use? I am hesitant to use a chemical because I still want the non-laser etched areas to be shiny and I'm afraid I won't be able to control it, even if I masked it off.
View attachment 1089426
I think you need more coats of clear so you can fill in the "grain" of the laser etched parts and level it if you want a uniform satin, otherwise your not really going to be able to get down into the low spots and it will still be shiny, I had the same problem with one of my rat rod style basses and I decided to turn it into a "feature" rather then fill and level.
 
Okay so I did the final coats (pics to come).

Having trouble getting a signal from the piezo. I know that with magnetic pickups, you can just tap the pole pieces with a screwdriver to see if it makes a sound when plugged in. I didn't notice any sound coming out when I tapped the piezo saddles.

I also tried taking a string, pulling it through the bridge, held the string taut and 'strummed' it it to see if I could get a tone. I still did not hear anything through the amp (I don't have the neck screwed in otherwise I would have just strung it up the normal way).

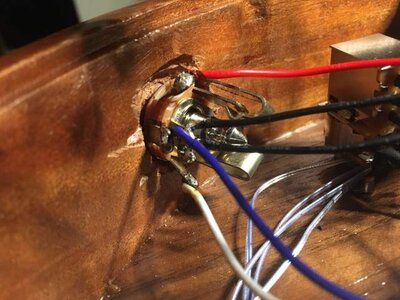
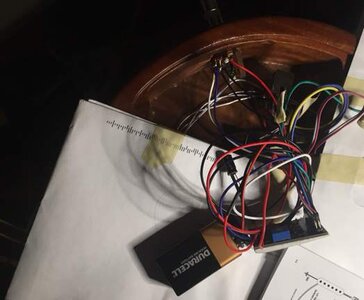
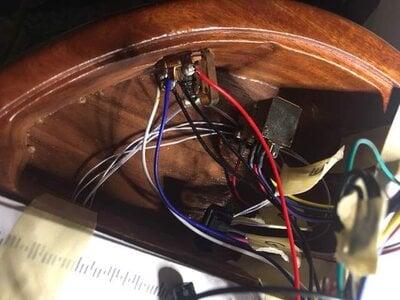
I attached pics, maybe you guys can see where I went wrong? Please note, these are not the prettiest solder joints, they are literally the first that I have ever done.

I also attached the diagram from the manual showing what color wires need to go in what spot. I double and triple checked, and it seems like I put everything in the right place. I must be missing something?

As a last ditch effort, I tried turning the volume knob (the only pot I have installed) clockwise and counterclockwise just to make sure it wasn't turned all the way down, but still no luck.

Lastly, I know that the area by the input jack looks like hell. I didn't make the wood thin enough for the input jack so I had to dremel it back from inside the control cavity, hence the ugliness. Just try not to look at it, it will be covered almost always, I know it's hard to deal with.

The biggest difference that I see is that the pot that I'm using doesn't have a little cylindrical thing (it's a push-pull pot), so I didn't apply a ground wire there. Could that be it?

Also please note, I don't have any quickswitch, or magnetic pickups on this bass, so you can ignore that part of the diagram.

EDIT: still doesn't work, but I realized that the battery was not attached to the PC board properly (it was backwards). Like I said, this did not fix it, but at least I caught it. Otherwise, all of the wiring is good to my knowledge.
Screen Shot 2017-04-10 at 4.26.18 PM.png


IMG_1148.JPG IMG_1147.JPG IMG_1150.JPG
IMG_1148.JPG
IMG_1147.JPG
IMG_1150.JPG
 
Last edited:
Last night I did some troubleshooting but to no avail.

Here are some things I tried:

*Unplugged the volume pot from the PC board
*Tried flipping the wire that goes from the summing board to the PC board back and forth (maybe I had it plugged into the board backwards? Turns out it didn't seem to matter)
*Removed the summing board (the part that connects all the piezo pickups together and goes into the board) and just plugged one of the piezo wires directly into the board (to see if maybe I got a faulty summing board)
*Tried turning the gain WAY UP on the amp. I get some buzzing noise (probably because the cavity is totally exposed to the air) when I turn the gain way up, but still no sound from the actual piezo pickups.
*For what it's worth, when I added the pots back into the chain, the buzzing was much worse with the gain turned way up. Pretty sure I need to ground it.
 
At this point i've sunk about 3 hours into this thing. Tried re-soldering the joints. Triple and quadruple-checked the diagram against what I've been doing. I tried every combination of possible permutations and troubleshooting, except the one that works. I'm wondering if it's possible that the piezo system is broken.
 
Nice.

So what ended up being wrong with the pickup / preamp?

Some of the wires for the saddles were damaged during installation. The wires are ridiculously fragile, which in my opinion is a major flaw with this pickup system. The problem is that you have to force the saddles through tiny slots in the bridge that's barely wide enough to accommodate the saddle. Graphtech should make these holes bigger. The E and A saddles were broken, which is the only ones I tried plugging directly into the board to test. I foolishly didn't think to try the D and G saddles (which worked).

I ordered another set of saddles from Graphtech and it should be here late next week. I just wanted to get some photos in before I get the new saddles installed and start playing it out (much higher risk of denting/damage etc).

I'll still use Graphtech saddles because the sound is so unbelievably awesome (at least from what I can tell with the D and G saddles).

The way I did it with this build, I have one hole for each saddle. This made it hard to fish each individual saddle from the bridge to the control cavity. I literally had to get a piece of wire, make it into a hook shape, and try to grab them and pull them into the control cavity from the bridge!

But for future builds, I'm going to actually rout out a big hole through the top directly underneath the bridge. This way I can bundle all 4 saddles together, and only do one simple wire-fishing job as mentioned above. Less likelihood of damaging the super fragile wires.
 
Awesome build, congrats! How does it sound?

It sounds very much like a Rob Allen fretless, but this particular system (graphtech acousti-phonic) has a little bit more punch and grit. Rob Allens use Fishman piezo pickups. It could be that it's a metal bridge, whereas Rob Allen's bridges are wood, or that the tuning of the system is simply different. It could also be my playing style or the new strings too. Not sure how much tapewounds mellow out with playing time, if at all. Hard to say why it sounds the way it does, but the sound is really interesting and unique. The sound actually exceeded my expectations. I'll post sound samples within the next week or so.
 
Congratulations on surviving your first build. And its truly an awesome looking instrument. Not everyone can do this. A lot of people under appreciate what actually needs to be considered when contemplating the hundreds of decisions that need to be made before making a guitar of any sort. You have an instrument that I'd be proud of myself and a far better result than the first one I made.
 
Congratulations on surviving your first build. And its truly an awesome looking instrument. Not everyone can do this. A lot of people under appreciate what actually needs to be considered when contemplating the hundreds of decisions that need to be made before making a guitar of any sort. You have an instrument that I'd be proud of myself and a far better result than the first one I made.

Thanks @Mark Wybierala ! I really appreciate that. I had a bit of an advantage since I am a designer by trade who builds things by hand on a somewhat regular basis.

With that said, I must be honest; this has been one of the most challenging things I have ever built. If you go through the pages of this thread you'll see endless hiccups and screw-ups from start to finish. Wood moves!

The hardest part for me was the finishing. It's pretty good, but not quite at a professional level. Avoiding denting/dinging during the finish is SO INCREDIBLY DIFFICULT! There are a handful of little tiny dents, dings, and scratches all over the body from setting the body down on a table, or just barely grazing it against something when transferring from the spraying area to the drying area.

Photographing in optimal lighting definitely helps make the finish look its best, though. I tend to be my own worst critic, though (like many other designers/builders).

here's one more pic. Like I said, sound samples and a whole array of pics coming soon!

CROPPED_EDITED_IMG_9186AAAedited.jpg