Back off. Leave this thread. Thanks.Okay, I thought I didn't have anything else to say but I'm kind of incredulous right now, and part of me honestly wonders if you're just trolling at this point. The facts that you pick and choose which steps you want to follow and that you also tend to leave out key details of what you did at first...
why would you 1) add water to an already thin product and 2) after adding the water expect dry times to be the same after you altered a KEY PROPERTY with regards to dry time?
At a certain point common sense has to kick in. If you add water to a water based liquid, it's going to take longer for that water to evaporate, hence longer dry time. I have no idea where you got this idea from, but quite frankly directions aren't a buffet. You can't pick and choose which steps you want to follow and then expect everything to work out great.
If you actually did lightly sand at 220, you would know if it's shiny or not.
this makes no sense as dry time is both application method as well as product, but again, that all goes out the window because you added water to the product. Again, at a certain point you need to use common sense.
I've used water based poly just not this specific product on guitars. Orange peel is not inherent to any particular product, it's either from improper technique, bad product, or in some cases extreme environment (too hot/too humid). You hit the first two by 1) not waiting until it's dry to apply the next coat and 2) modifying the paint by adding water.
If you brush on you have a chance of moving the decal and also creating brush marks on top of it.
I remember telling you that you are making this harder than what it needs to be. You absolutely are. I also remember telling you in another thread that this is more difficult than it seems and especially for beginners, you're going to want to practice on scrap wood to get it down.
I also have given you step by step instructions and a ton of information to prep you for success, as have others.
I honestly can't understand your thought process around this, and I'm not trying to insult you or be an ass. I am genuinely trying to be helpful, and you ... I don't know what you are doing tbh.
Good luck.
Enjoy the benefits of a premium membership!
Upgrade Account
-
Welcome to TalkBass! Want to remove ads? Register an account and login to see fewer ads, and become a Supporting Member to remove almost all ads.
You are using an out of date browser. It may not display this or other websites correctly.
You should upgrade or use an alternative browser.
You should upgrade or use an alternative browser.
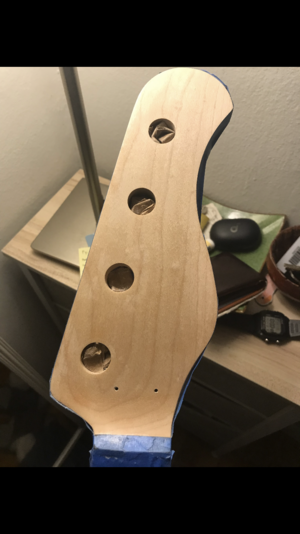
Help! Clear polyurethane spray can is beading on bare maple
- Thread starter Stagelab
- Start date
More options
Who Replied?I don't see trolling here, trolls almost never participate in the discussion, just pull the pin and watch people go nuts about whatever topic they've chosen to rile people up.
I do see (and I know this from experience) the learning curve we go through when trying to finish instruments for the first time. It ain't easy, different products react differently and mistakes are just part of it.
At this point I wonder if your can of poly has a fouled nosel? Maybe the mist is denser than it should be, though I've read here on TB that water-based is like that, larger droplets in the atomizing. You should definitely test on scrap, maybe get another can just to rule it out?
Thanks. I’m not a troll, I’m just a pretty experienced bassist who is a novice when it comes to repair work beyond basic setups. Doing my best but making some missteps along the way, which is pretty common when you’re a beginner.I don't see trolling here, trolls almost never participate in the discussion, just pull the pin and watch people go nuts about whatever topic they've chosen to rile people up.
I do see (and I know this from experience) the learning curve we go through when trying to finish instruments for the first time. It ain't easy, different products react differently and mistakes are just part of it.
At this point I wonder if your can of poly has a fouled nosel? Maybe the mist is denser than it should be, though I've read here on TB that water-based is like that, larger droplets in the atomizing. You should definitely test on scrap, maybe get another can just to rule it out?
Good point. It could be an issue with the can or could it be this product tends to spray unevenly resulting in orange peel? Idk. I can buy another can but not thrilled with spending another $20 if both cans are a bust. I’d rather try a different product but I don’t know many spray water based varnishes.
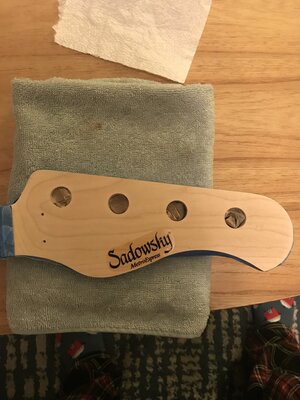
Here’s where I’m at currently. Two coats brushed on with two hour dry time and 220 sanding when dry. Did not dilute the first coat in distilled water this time — did that last time following advice I got on this thread. Finish looks better. Pic attached.
Decal maker told me the finish needs to be polished and glossy for the decal to adhere. Edit: and to avoid a milky appearance when you apply the first coat over the dried decal. I could sand to higher grits — 400, 600, 800 etc and see if I can bring out gloss.
As for spraying, I have a hunch I’ll get orange peel once I spray over the dried decal. Edit: When I sprayed yesterday I followed the instructions I got here, zig zag, 10” away, shook can, held it upright etc. Sprayed on scrap wood this morning and got orange peel. Some have told me with more coats and sanding the orange peel will dissipate. Others have said that’s not true. Idk.
Edit: I only have one decal right now.
Attachments
Last edited:
I wouldn't sand with 220, stick to 400. It should give you texture enough for the next coat to adhere. Wet sanding out orange peel is pretty common when you spray clear finish. Just need to make sure you've got build up enough to remove it without burning through.
I think I'd brush on a few more coats, see if the product glosses up as it builds. Then lay the decal, spray more thickness than needed, wet sand it flat with 400, 600, 800, 1000, then buff with polishing compound to get the final flat glossy finish.
I think I'd brush on a few more coats, see if the product glosses up as it builds. Then lay the decal, spray more thickness than needed, wet sand it flat with 400, 600, 800, 1000, then buff with polishing compound to get the final flat glossy finish.
Sounds good. I’ll brush on a few more coats waiting 2hrs in between. Will try 400 grit. In the end I want a satin finish—the rest of the neck and headstock is satin—so I’d stop after wet sanding.I wouldn't sand with 220, stick to 400. It should give you texture enough for the next coat to adhere. Wet sanding out orange peel is pretty common when you spray clear finish. Just need to make sure you've got build up enough to remove it without burning through.
I think I'd brush on a few more coats, see if the product glosses up as it builds. Then lay the decal, spray more thickness than needed, wet sand it flat with 400, 600, 800, 1000, then buff with polishing compound to get the final flat glossy finish.
I brushed on 3 more coats and sanded 400 2hrs after each application. just a little gloss. Not sure this is ready for the decal. Took a video to try to show it under the light.I wouldn't sand with 220, stick to 400. It should give you texture enough for the next coat to adhere. Wet sanding out orange peel is pretty common when you spray clear finish. Just need to make sure you've got build up enough to remove it without burning through.
I think I'd brush on a few more coats, see if the product glosses up as it builds. Then lay the decal, spray more thickness than needed, wet sand it flat with 400, 600, 800, 1000, then buff with polishing compound to get the final flat glossy finish.
Last edited:
It’s a gloss finish which is why I expected more shine. I’ll bite the bullet and apply the decal.Definitely has coverage, the wood looks pretty well sealed. Is it a satin finish poly you're using? If so it won't get really glossy, though should be an appropriate surface for the decal.
It’s a gloss finish which is why I expected more shine. I’ll bite the bullet and apply the decal.
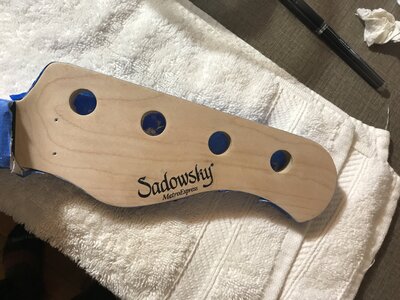
Applying the decal and getting rid of air bubbles was by far the easy part. I’ll let it dry overnight and I’ll tap it gently in the morning to see if it stuck. I assume as long as it adheres decently well, it’ll be ok cause the poly on top will seal it in.
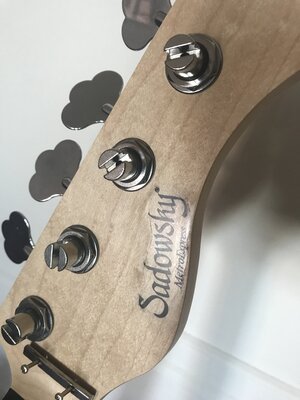
Disclaimer: this is a Sadowsky Metroexpress bass. I’m not trying to pass something off for something it’s not!
Attachments
That’s cool. I like the neck trick.Cool, I just bought some of the metroexpress parts that were up on ebay. Slapped a lefty neck on a right handed body. It's a pretty nice bass
View attachment 7049373
Mine is fretless, same color. I would have loved assembling one from parts but the fretless necks are pretty hard to find. There are still good deals on their fretted necks on eBay, actually.
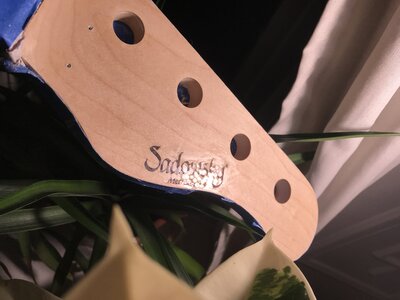
Finished decal attempt #2 and I'm happy with the result. I ended up applying 10 coats after the decal dried, then wet sanded, then applied 10 more coats, and wet sanded again. Pic attached.
If the light hits the headstock at a certain angle, you can see gloss and some orange peel over the decal (pic 2) but I’m not sure how to deal with that without risking sanding thru the decal. I already wet sanded a lot to where you can’t feel the decal or see the outline (unless the light hits at that angle).
So I’m gonna put the bass back together and call it a day!
Attachments
You can try burnishing the finish with a crinkled up brown paper bag. Use it like you would a polishing cloth. It can help bring an even consistent satin to the finish and won't remove anywhere near enough to screw with the decal.Finished decal attempt #2 and I'm happy with the result. I ended up applying 10 coats after the decal dried, then wet sanded, then applied 10 more coats, and wet sanded again. Pic attached.
If the light hits the headstock at a certain angle, you can see gloss and some orange peel over the decal (pic 2) but I’m not sure how to deal with that without risking sanding thru the decal. I already wet sanded a lot to where you can’t feel the decal or see the outline (unless the light hits at that angle).
So I’m gonna put the bass back together and call it a day!
Thanks. Gave it a try. This is how it looks now when the light hits it at that angle. Is this the outcome you had in mind? Still pretty glossy but consistently glossy throughout.You can try burnishing the finish with a crinkled up brown paper bag. Use it like you would a polishing cloth. It can help bring an even consistent satin to the finish and won't remove anywhere near enough to screw with the decal.
