Scared in a good way?Thanks. All three are scaring me a little.
Enjoy the benefits of a premium membership!
Upgrade Account
-
Welcome to TalkBass! Want to remove ads? Register an account and login to see fewer ads, and become a Supporting Member to remove almost all ads.
You are using an out of date browser. It may not display this or other websites correctly.
You should upgrade or use an alternative browser.
You should upgrade or use an alternative browser.
Building Slowly
- Thread starter Matt Liebenau
- Start date
More options
Who Replied?Scared in a good way?
I was going to hold off on any discussion, partially because it’s been hashed out before, by me among others. We’ve discussed imposter syndrome and related issues before. I just have a hard time with being able to or having done something good. These bodies and the serape one I did earlier are really nice, although the serape one had a couple of spots that could have been taped off better so that eased my issues. I know they’re nice but at the same time I had moments where I was concerned I was going to “subconsciously but on purpose” pooch something up so everything could seem ok. I am getting better and I’m recognising when it’s happening but that’s definitely held me back not just in building. I’m good at what I do for work too but I’ve seen hacks get ahead because they’re full of themselves enough that everyone buys into it, for a while anyway. That’s also at least part of what keeps me from trying to sell stuff. Although I’ll need to deal with that aspect sooner or later because the basement is getting silly.
Anyhow, that’s more than I intended to post. I know there’s at least a few folks here who understand. Like I said, I’m working through it.
My son does a far better job of selling my wares than I do.I was going to hold off on any discussion, partially because it’s been hashed out before, by me among others. We’ve discussed imposter syndrome and related issues before. I just have a hard time with being able to or having done something good. These bodies and the serape one I did earlier are really nice, although the serape one had a couple of spots that could have been taped off better so that eased my issues. I know they’re nice but at the same time I had moments where I was concerned I was going to “subconsciously but on purpose” pooch something up so everything could seem ok. I am getting better and I’m recognising when it’s happening but that’s definitely held me back not just in building. I’m good at what I do for work too but I’ve seen hacks get ahead because they’re full of themselves enough that everyone buys into it, for a while anyway. That’s also at least part of what keeps me from trying to sell stuff. Although I’ll need to deal with that aspect sooner or later because the basement is getting silly.
Anyhow, that’s more than I intended to post. I know there’s at least a few folks here who understand. Like I said, I’m working through it.

I’m still my worst critic even after 40 years of building. I really should get over it. But having said that I just slotted a 34” scale fretboard for a 35” scale bass so I count myself in good company.I was going to hold off on any discussion, partially because it’s been hashed out before, by me among others. We’ve discussed imposter syndrome and related issues before. I just have a hard time with being able to or having done something good. These bodies and the serape one I did earlier are really nice, although the serape one had a couple of spots that could have been taped off better so that eased my issues. I know they’re nice but at the same time I had moments where I was concerned I was going to “subconsciously but on purpose” pooch something up so everything could seem ok. I am getting better and I’m recognising when it’s happening but that’s definitely held me back not just in building. I’m good at what I do for work too but I’ve seen hacks get ahead because they’re full of themselves enough that everyone buys into it, for a while anyway. That’s also at least part of what keeps me from trying to sell stuff. Although I’ll need to deal with that aspect sooner or later because the basement is getting silly.
Anyhow, that’s more than I intended to post. I know there’s at least a few folks here who understand. Like I said, I’m working through it.
Last edited:
I'm with you 100%. I've suffered from the same affliction my whole life.I was going to hold off on any discussion, partially because it’s been hashed out before, by me among others. We’ve discussed imposter syndrome and related issues before. I just have a hard time with being able to or having done something good. These bodies and the serape one I did earlier are really nice, although the serape one had a couple of spots that could have been taped off better so that eased my issues. I know they’re nice but at the same time I had moments where I was concerned I was going to “subconsciously but on purpose” pooch something up so everything could seem ok. I am getting better and I’m recognising when it’s happening but that’s definitely held me back not just in building. I’m good at what I do for work too but I’ve seen hacks get ahead because they’re full of themselves enough that everyone buys into it, for a while anyway. That’s also at least part of what keeps me from trying to sell stuff. Although I’ll need to deal with that aspect sooner or later because the basement is getting silly.
Anyhow, that’s more than I intended to post. I know there’s at least a few folks here who understand. Like I said, I’m working through it.
The confident people are the ones I *don't* trust.
Just catching up with your builds Matt. Those knobs are amazing and using pen blanks is a great idea and I’m going to give that a go for one of my builds on the bench
Just catching up with your builds Matt. Those knobs are amazing and using pen blanks is a great idea and I’m going to give that a go for one of my builds on the bench
Thanks. The only issue with acrylic pen blanks is they typically start at 3/4” square so even when I do everything right they end up at about 0.70” which is a little smaller than I’d like sometimes. There are bottle stopper blanks that start out at 1” or 1 1/2” but don’t come in as many colors. Woodcraft and Rockler have a 1” square by 6” or 8” mold for casting blanks which could be the way to go if someone got into that.
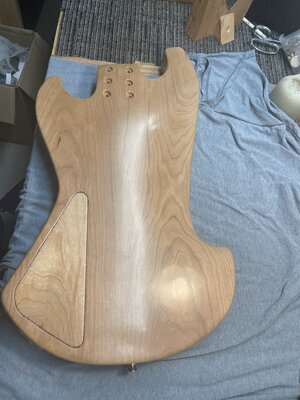
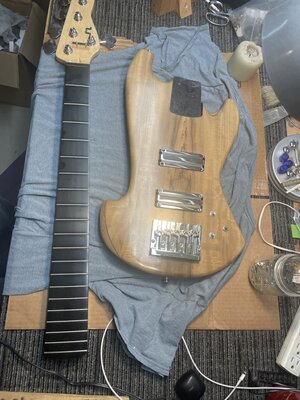
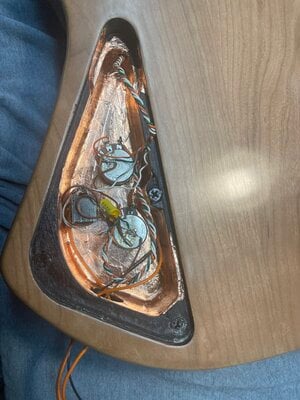
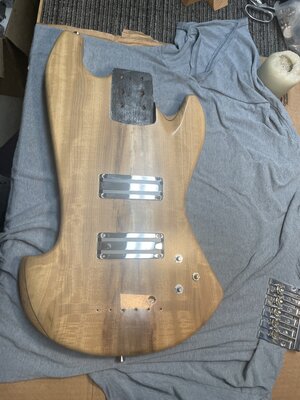
I started on the cherry and myrtle body. The electronics are installed and the hardware is attached. I tried something different with the bridge ground. I soldered the bridge ground wire to a piece of copper tape and installed it so the end of the wire is still in the recess and the tape is touching the bottom of the bridge. No wire pushing the bridge up or smashing strands of wire down into the body and finish. Undoubtedly a trick I got off of here.


Chrome was a good choice for the hardware on this body, it looks good with the lighter coloured wood. As I was attaching the neck I found a few issues and I’m going to have to pull the frets and level the board. With no strings and the truss rod fairly tight it has more relief than I’d like to see.

So, I spent a little time cleaning up the basement assembly area and will switch to the metal flake SBT body.


Chrome was a good choice for the hardware on this body, it looks good with the lighter coloured wood. As I was attaching the neck I found a few issues and I’m going to have to pull the frets and level the board. With no strings and the truss rod fairly tight it has more relief than I’d like to see.

So, I spent a little time cleaning up the basement assembly area and will switch to the metal flake SBT body.
Attachments
Since I need to work on the other neck I switched to assembling the metalflake bass. Had a long day at work on Friday and I needed to check on the Distiller wiring. I started wiring Saturday. The solderless blend pot was in the electronics parts box. It came with a preamp designed for 2 pickups that went into a single pickup bass. 25K ohm volume pot after the Distiller. Since all the wires are plug in at the board I only had to solder one end on most.


Kind of repeat pictures but the hardware installed and electronics tested.


Still can’t find a good angle to catch how the metalflake looks. I’ll try sunlight once it’s all together.


Kind of repeat pictures but the hardware installed and electronics tested.


Still can’t find a good angle to catch how the metalflake looks. I’ll try sunlight once it’s all together.
You guys get sunlight there? What's that like? 
I'm waiting on leather dye to arrive, so in the mean time I've shifted my focus to Christmas ornaments. I need to get on those anyways, already feel like I'm running out of time.
I'm waiting on leather dye to arrive, so in the mean time I've shifted my focus to Christmas ornaments. I need to get on those anyways, already feel like I'm running out of time.
You guys get sunlight there? What's that like?
I'm waiting on leather dye to arrive, so in the mean time I've shifted my focus to Christmas ornaments. I need to get on those anyways, already feel like I'm running out of time.
This time of year we get upwards of several minutes of sunlight a day! The key is to be home and to frantically run outside and take pictures when opportunity presents.

Well, all we get is clouds. I think we invented a whole music genre around it, Cobain kind of led that charge. 
Looks like last time I had the hardware and electronics on the body. I got the neck mounted and got it strung up. I picked the Rotosound black tapes for this body, more than partially because I figured they’d look cool with the finish and black hardware.

That’s actually a done picture. I forgot to take an earlier photo. I had to open up the nut slots, those tapes are big. I got a little nervous when I had to pull the G saddle way back to get it to intonate but it all settled into a nice place. The B was a little rattley so I raised the string height a little more than I usually would but it plays nicely.
After that it seemed like some knobs would be nicer than the bare potentiometer shafts. I took my partially finished ones, held them in my soft jaw pliers and opened up the main hole. One goes on a 6mm shaft so I drilled that to 6mm. The others were supposed to get inserts for 6mm knurled shafts so I worked those up to 10mm in steps. I pressed the first insert in and the knob split. I have a 10mm Forstner which seems to drill slightly larger then my 10mm twist bit so I used it on the second knob. It split too. I know I’ve used inserts on acrylic knobs before and they worked. In fact, the imitation horn I made the other knobs out of was pretty brittle and chippy and the inserts worked fine.

I sanded and finished the spare I had of the honeycomb knobs and decided to go with set screws (see! I catch on… eventually). I have a board that I cut a V into and I lined up the bottom of the V with my drill bit tip and clamped it down, double checked the alignment, moved it, reclamped, etc. Since I was drilling into a curved surface I used a spotting bit then the size for the threaded insert tap.

I tapped the holes and screwed in the insert and there they are.


I ended up using 2 honeycomb knobs and one of the green quartz. I’ll either make all three green quartz or go get another honeycomb blank and make a few more of those, no inserts this time. New knobs will be after thanksgiving however.
As I was planning to wrap up I noticed the control cover wasn’t staying attached as well as I’d like. The other one on the natural body stays on quite well with the magnets in the cover and screws in the body but this one made me nervous so I removed the screws, drilled the holes a little with a 5/16” Brad point and CA glued in some magnets after confirming the orientation. I checked when I got home from work today and the cover stayed firmly attached even through some of the most athletic standing ever.

I played through my amp and that Distiller sounds great. You can dial in all sorts of tones and it can even bring out some clank in those tape wound strings. Thanks @Jerry Catanescu ! I’d definitely recommend a distiller to anyone who would like to have it recommended to them!

That’s actually a done picture. I forgot to take an earlier photo. I had to open up the nut slots, those tapes are big. I got a little nervous when I had to pull the G saddle way back to get it to intonate but it all settled into a nice place. The B was a little rattley so I raised the string height a little more than I usually would but it plays nicely.
After that it seemed like some knobs would be nicer than the bare potentiometer shafts. I took my partially finished ones, held them in my soft jaw pliers and opened up the main hole. One goes on a 6mm shaft so I drilled that to 6mm. The others were supposed to get inserts for 6mm knurled shafts so I worked those up to 10mm in steps. I pressed the first insert in and the knob split. I have a 10mm Forstner which seems to drill slightly larger then my 10mm twist bit so I used it on the second knob. It split too. I know I’ve used inserts on acrylic knobs before and they worked. In fact, the imitation horn I made the other knobs out of was pretty brittle and chippy and the inserts worked fine.

I sanded and finished the spare I had of the honeycomb knobs and decided to go with set screws (see! I catch on… eventually). I have a board that I cut a V into and I lined up the bottom of the V with my drill bit tip and clamped it down, double checked the alignment, moved it, reclamped, etc. Since I was drilling into a curved surface I used a spotting bit then the size for the threaded insert tap.

I tapped the holes and screwed in the insert and there they are.


I ended up using 2 honeycomb knobs and one of the green quartz. I’ll either make all three green quartz or go get another honeycomb blank and make a few more of those, no inserts this time. New knobs will be after thanksgiving however.
As I was planning to wrap up I noticed the control cover wasn’t staying attached as well as I’d like. The other one on the natural body stays on quite well with the magnets in the cover and screws in the body but this one made me nervous so I removed the screws, drilled the holes a little with a 5/16” Brad point and CA glued in some magnets after confirming the orientation. I checked when I got home from work today and the cover stayed firmly attached even through some of the most athletic standing ever.

I played through my amp and that Distiller sounds great. You can dial in all sorts of tones and it can even bring out some clank in those tape wound strings. Thanks @Jerry Catanescu ! I’d definitely recommend a distiller to anyone who would like to have it recommended to them!
That looks wonderful. Love the "burst"Since I need to work on the other neck I switched to assembling the metalflake bass. Had a long day at work on Friday and I needed to check on the Distiller wiring. I started wiring Saturday. The solderless blend pot was in the electronics parts box. It came with a preamp designed for 2 pickups that went into a single pickup bass. 25K ohm volume pot after the Distiller. Since all the wires are plug in at the board I only had to solder one end on most.
View attachment 7079957View attachment 7079958View attachment 7079959
Kind of repeat pictures but the hardware installed and electronics tested.
View attachment 7079960View attachment 7079961View attachment 7079962View attachment 7079963
Still can’t find a good angle to catch how the metalflake looks. I’ll try sunlight once it’s all together.
even through some of the most athletic standing ever.
I do athletic standing as part of my regular workout routine. Ten pound bass on the shoulder. Pretend to play it for 4 minutes. Sit down and rest. Working my way up to 20 reps.
This one is also assembled and set up.

I negotiated with the neck for a while and was able to persuade it that it wanted to be straight or actually have a slight back bow. Then with the resin (Ebanol) straight I leveled the frets again got the neck into a back bow a second time and strung it up. I ended up needing to loosen the truss rod a bit to get good relief so we’re in a good spot for now. If the neck moves significantly I’ll have to pull frets and level the board. The Lace Bassbars are interesting. They sound pretty good. I decided to use a push pull pot for the tone and wire in the “single coil” mode. It works well enough for a passive set up. I can even favor the bridge pickup and roll off the tone a little and not get queasy about my tone which I can’t do with all two pickup passive basses. Installation was fun. Where “typical” soapbars have a hole all the way through that the mounting screw passes through these have nothing underneath and it took a few tries to get the screws lined up with the holes. Also, Lace gives you foam to install under each pickup end for height but it’s sketchy. I wonder if springs around the height screws would work better. I may try that in the future. I need to play it a bit and see if the pickup mounting bothers me.
I thought I got the 19mm version of the Hipshot bridge but the B and G are a little more in from the edge then I’d ordinarily like with the saddles as far open as they can go. I did get it from their scratch and dent eBay store or the neck may be for an even wider spacing? I’ll have to measure my fretless 5. The few minutes I played it felt quite nice though.
Anyway, that just leaves the headless guitar to get together.


